Welcome to a new feature here at Michele Made Me which I am calling MY TINY BRAIN WAVE. On occasion, semi-regulary, when the mood strikes and the stars align, I will be posting ideas that I’ve come up with that are NOT A CRAFT (gasp) but rather a clever idea (in my opinion) that might help with crafting in some way.
So today in my Tiny Brain Wave #1, I will show you how to make a fabric tube turner from stuff you have at home. Now if you are not familiar with the so-called tube turner, it is a tool that one uses to take a tube of fabric that is wrong-side out and efficiently flip it good-side out. Now I suppose I could have gone out and bought myself an actual fancy-shmancy tube turner. But why, I ask you, should I spend the money when I can make one in about a minute flat from stuff I have right here?
What motivated this Tiny Brain Wave?
Recently I worked up a sweat in both the making of tiny little straps for a softie I made, and also in the making of a narrow sash for my son’s Halloween costume. The whole time while struggling with these fabric tubes I was cursing internally: For the love of Pete, there’s gotta be a better way to flip this flippin’ thing over!!!
And so, I came up with this…
Tutorial: Fabric Tube Turner
You will need:
- A large-ish plastic container of some kind
- Your trusty exacto knife
- A writing implement (I used a sharpie)
- A ruler
1. Clean your plastic container.
2. Using your exacto knife, cut off the top of the container.
3. Draw straight lines down one of the sides of your container with the help of a ruler.
4. Cut off the lined side of the container.

5. Cut a narrow strip off the side as shown in #5 below. Mine is about 1/4 inch wide. The width will depend on the width of your fabric tube. The wider the fabric tube, the wider the strip.
6. Make a 2 inch slit in the end of your plastic strip. As shown, the slit should be 1/8 inch wide at the strip end and become narrower until it is just the width of your exacto blade.
YOUR FABRIC TUBE TURNER IS COMPLETE! Now to use it…
7. Make your fabric tube a few inches longer than intended. Cut off a few inches of fabric along the length as shown by the arrow in photo #7. So, right now your fabric tube is wrong-side out.
8. Slide your tube turner into your fabric tube.
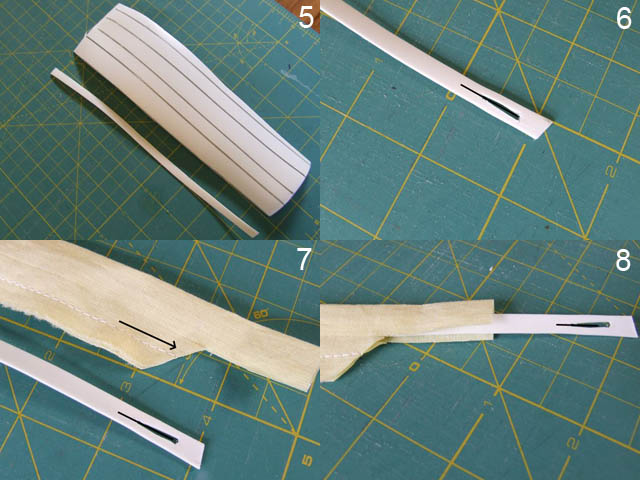
9. Stick the cut end of your fabric tube into the slit on the tube turner and pull it firmly into the narrow end of the slit so that it stays in place.
10. Gather up the fabric tube toward the slit end of the tube turner.
11. Gently work and pull the fabric tube over the slit end of the tube turner. This will take a moment of your time. Be patient. Now, while pulling on the exposed end of your tube turner, simultaneously pull on the fabric tube keeping it between your fingers.
12. Pull the fabric tube all the way through.
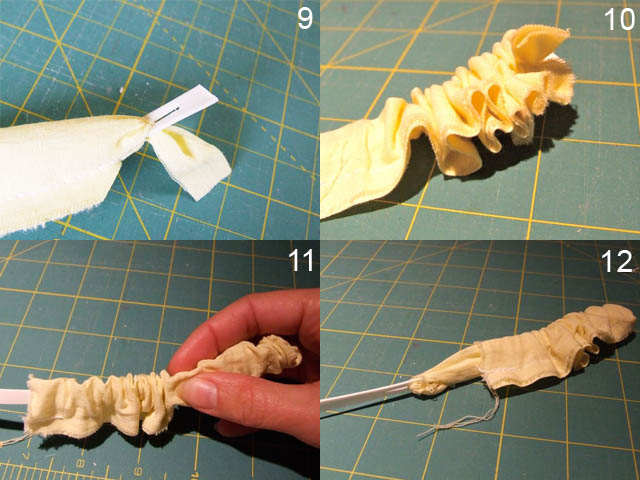
It is now good-side-out. And works SO much faster than the alternative! Yippee! I love labour-saving devices!

Note: If the fabric tube that you are trying to flip over is really long, you can easily make a long fabric tube-turner by taping (with good quality packing tape) several lengths of plastic together, with the slit at one end as I’ve shown you.
So, that’s it. My tiny brain wave. I hope this is useful to you! Let me know if you give it a go.
Now you have yourself a fabulous day!
Such a good idea. I had sworn off making neck ties for my son because I really dislike turning small tubes of fabric. This is brilliant. Thanks.
Oh mu goodness, this a fantastic Idea. I hate when it is time to turn tubes back to right side. I also love it uses a item I happen to have about go in the trash. YAHOO!!!
Wonderful idea and thank you so very much for adding your Tiny Brain Waves to your blog:)
Not weary of making straps for the girls dresses thanks to you!
Have a great Tuesday:)
Ann Flowers
flowerscrazyq@gmail.com
Wow! I use a purchased tube turner, but wow! I'm thinking the idea of making the tube longer and using plastic might be even easier.
Great brain wave! Love when that happens.
Wish I had seen this before I spent a frustrating hour turning out a long 1/2" tube.
This is an absolutely brilliant idea. Thanks so much for sharing with us. Off to find a plastic bottle this very minute.
I am so glad you had this brain wave. I really do not like turning little pieces (I am working on a project right now that involves this step). Thanks for posting this!
Love it Michele. Such a handy tool, every quilter needs one – Thanks for sharing – Hugs Nat
Clever, clever!!!
Pretty clever…it is frustrating trying to turn fabric inside out!! Stop over to enter a vintage giveaway!
Great idea Michelle I'm am definately going to make me one of these it get's so frustratinf tryint to turn those tiny pieces!
OOOOH , what a goooood idea !!!! I will sure use it , my witches legs , etc , were so ooooo difficult to turn !!!!!!
Yeah for a great idea I need! Thanks for sharing!
Ah ha! I love this li'l project, and I love the plan of giving us tiny brain waves. I know you have many. Looking forward to a hundred tiny waves a year. Splish, splash.
what I great idea – I always struggle with turning my strips of fabrics AND I have one of those fancy turny-out sticks….which is now in the bin.
xxh
Totally useful!
waooo…smart idea…great!!!thanx for sharing madam!!!
Genius! I'd love to give it a try and will for my next project! 🙂 Thanks for checking out my BQF submission, I love your pathwork quilt!
I have a purchased one, but I like this better, it looks like the fabric would stay in the "eye" easier.
That is genius! This is my first visit and I'm a new follower! Love your blog.
Nice! I think I'll make one for myself! {I currently use a chopstick to flip fabric tubes} 🙂 Thanks for sharing!
Can we say Smart!!!
And here I just spent all eveing sitting with a chopstick trying to turn two tubes for these paci clips.
http://karascreativeplace.blogspot.com/2010/11/pacifier-clips.html
I acually got tired of making the fabric ones because of the turning. Well I think you just made some friends of mine with new babies happier.
That is absolutely genius and so clever! Thanks for sharing the idea, I will definitely be make myself some of these!
Blessings'
Catlyn
Hi!! I am your newest follower from the crafty link up! I love finding new blogs and yours is lovely:) You can find me at http://www.bouffeebambini.blogspot.com
Take a peek at my giveaways if you come by. Everything is handmade and gorgeous!
I love this project! great ideas
FANTASTIC!!! I've been searching for something like this for weeks now. You're a proper genius!
Thanks a million!
wowww what a clever idea!!! is fantastic:-)
What a brilliant idea and way to repurpose that container!! I'm going to have to make one of these. What would happen if you made a really long spiral instead of taping straight sticks together? I want to make some longer tubes. Guess I'll just have to try it out. 🙂
Thanks for sharing!
Mieljolie
Hmmm.. would it be silly to admit that I have never even heard of a tube turner? I have always used the old safety pin method. I guess I have been missing out! I will have to give this a try. Thanks for sharing your brilliant idea!
Rochelle @
http://homesweethomebodies.blogspot.com/
Very clever, Michele! I have visited your blog a few times, and am always amazed at your creativity. I think I'm going to put you on my "must read" list. Thanks for posting this…oh, and I loved your "Feast of the Flowers" project,too.
Just wonderful, – truly love the way your mind works! Thank you SO much!
Have a very merry christmas!! 🙂
Best regards Eva Mari in Norway
You may be a genius! Love this idea – going to make one today! Thanks for saving me SO much time 🙂
oh… and I'm your newest follower!
Wow this is great! Thanks for sharing.
Thanks so much! This will be perfect for my after school craft class. Safety pin method works too, but I think this is better. Thanks for sharing.
Wanted you to know I posted a link to this tutorial today on my blog.
Nancy Ward
PaperFriendly
http://www.nancywardcrafts.com
Hi,
if the tube is REALLY long you could make a little hole at the other end of the plastic, attach strong string/ribbon/yarn and pull the plastic. I mean instead of taping few pieces of plastic.
I hope you see what I am trying to explain.
All best,
Ewa
the things you do are pretty amazing,
thank you for sharing
Great idea! I love it! Thanks
Thanks for the simply and great idea!
Ciao from Italy
Flavia
Je savais bien que j'avais vu ça chez toi ! ça doit pouvoir servir pour les membres de poupées en chiffon … Il faudra que j'essaie … Pour voir si j'ai bien compris …
Tiny brain wave? This is GENIUS and it's my favourite price, FREE!!! Yay and thank you!
magnifica idea. gracias por compartir tus conocimientos
absolutely awesome…… thats a wow idea….. thanq thanq