I couldn’t sleep the other night. I wasn’t feeling well. I’m all better now though, thank goodness. Unfortunately, the inability to sleep is a frequent occurrence. The thoughts get busy in there, working away, wreaking their havoc on my sleep patterns. And the whole exercise becomes futile and frustrating. I become fixated with the ebb and flow of my husband’s breathing. I hang on every little creak in the house. I end up with a good-for-nothing lump of blankets in the middle of the bed. Eventually, I get up, defeated. I rise to foil those little sleep-busting thoughts. I call their bluff! And usually, I start making something.
This is what happened to me the other night when gripped by my old nocturnal friend, Insomnia. I didn’t fight her. I didn’t bother. I got up and made these.
Yep, the old make-a-wreath-out-of-toilet-paper-rolls-when-you-can’t-sleep trick… Classic, am I right? I mean, this happens to you sometimes too, doesn’t it?
Well just in case it doesn’t, I made up a tutorial, so that next time sleeplessness strikes, you’ll be fully prepared.
Let’s get to it shall we?
Tutorial: Toilet Paper Roll Wreath Ornaments
To make ONE wreath you will need:
- 2 toilet paper rolls
- Liquid acrylic paint in metallic gold and some bright colour of your choice
- Gesso or white acrylic paint
- Paint brush
- Ribbon
- Pencil
- Ruler
- A pair of scissors
- Glue
- Clamps (I used clothes pins)
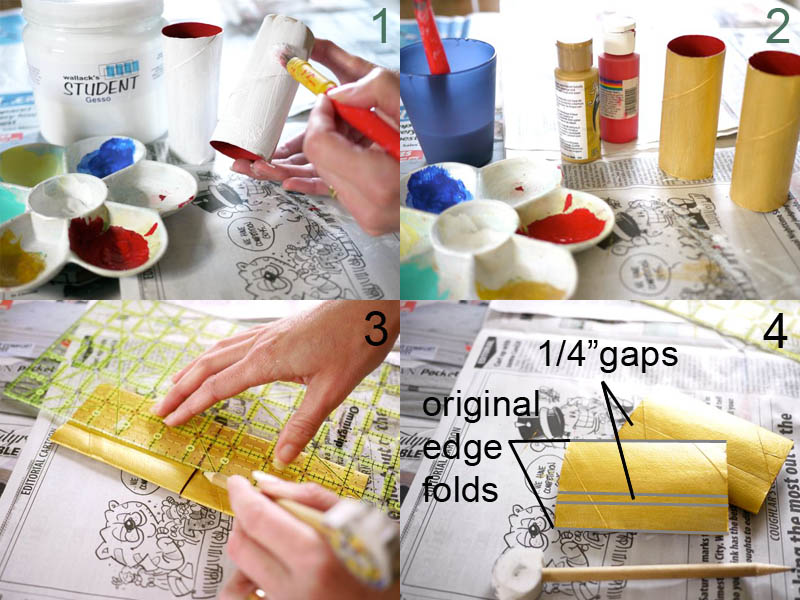
1. Apply a coat of gesso to the inside and outside of the toilet paper rolls. If you don’t have gesso (which is a mixture of plaster and glue that accepts paint extremely well) you can use white acrylic paint. After the TP rolls have dried, apply 2 coats of your colour choice to the inside. Let the paint dry between coats.
2. Now apply 2 coats of metallic gold paint to the outside of the TP rolls allowing it to dry between coats.
3. Flatten out your TP rolls. Note that the rolls now have two folds. These are the “original edge folds” which I will be referring to later. Draw a line across both TP rolls about 1/2 inch from the edge. Draw a second line 3/4 inch from the edge. That leaves a “1/4 inch gap” between both lines. I will also be referring to these “1/4 inch gaps” many times in this tutorial.
4. Flip the flat TP rolls over and mark them in exactly the same way on the reverse, starting from the very same edge. Thus there are two 1/4 inch gaps on both rolls, one on either side.
5. Pinch and crease the TP rolls in the centre of the 1/4 inch gap. Do this on both sides of the rolls.
6. Your rolls will hopefully look as mine does in #6.
7. Flatten out your TP rolls again and draw a series of parallel lines running down them at 1/4 inch intervals.
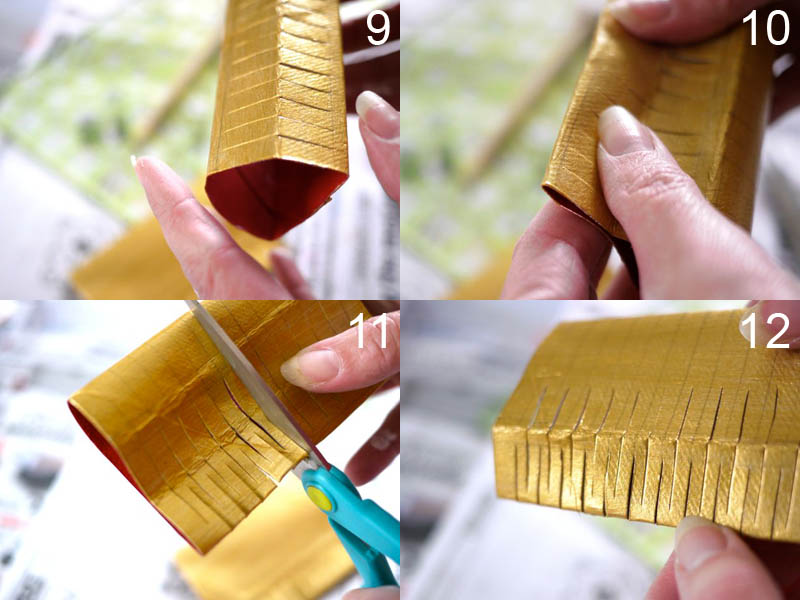
8. With your scissors, make cuts following the short section of the parallel line series to the edge of the 1/4 inch gap. Do NOT pass the 1/4 inch gap line.
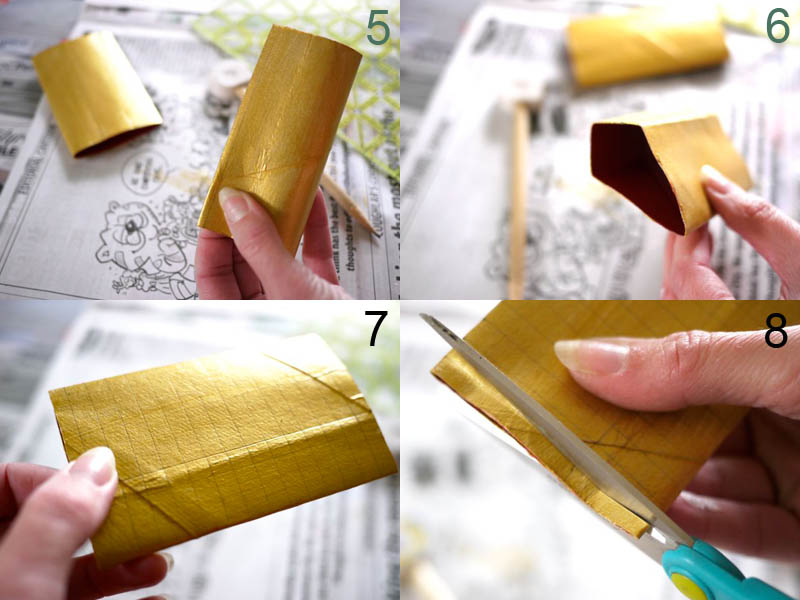
9. Once complete, the cuts will look as mine do in #9.
10. Remember those creases you made in the center of the 1/4 inch gaps? Here’s where they come in. Fold your TP roll along one of those 1/4 inch gap creases now.
11. With the crease facing you as in #11, make cuts between the marked lines. Your cuts will be in the middle of, and run parallel to your other cuts, and end 1/8 inch away from “the original edge fold”. I did it by eye but you could draw a line for exactness.
12. Repeat 10 and 11 for the 1/4 inch gap crease on the other side.
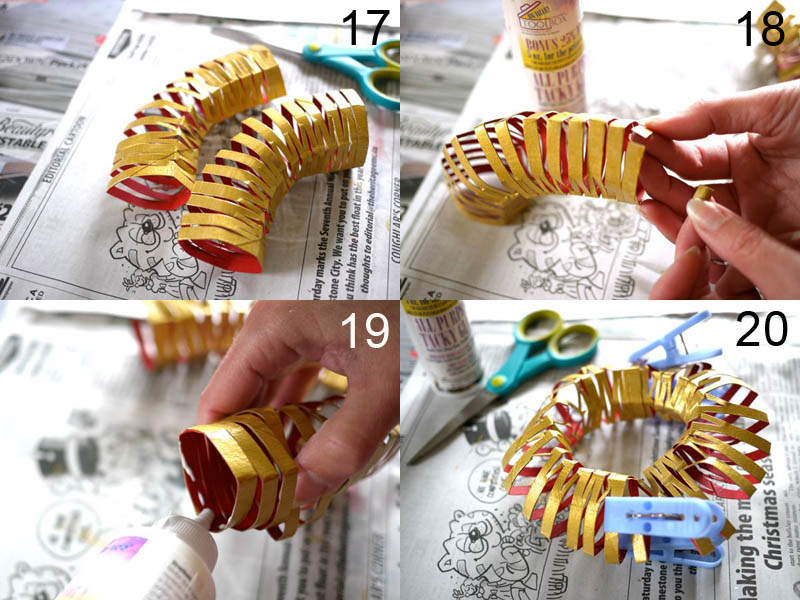
13. Flatten your TP rolls along the original edge folds.
14. Cut along the long section of the parallel line series up to the 1/4 inch gap line. Do NOT cut past the line.
15. Your cuts are complete! Yippee!
16. Re-form the TP rolls as best you can.

17. Gently pull them slightly apart and then mould them into curvy shapes.
18. Take one of the TP rolls and snip out a little piece of the end ring. You do this so that the end will slide nicely into the ends of the other roll in order to make a doughnut shape.
19. Take the uncut TP roll and apply glue in the end rings.
20. Fit the cut ends of one roll into the uncut ends of the other. Clamp in place. Wait for the glue to dry. Tie a ribbon around your little wreath ornament because it is time to hang that pretty up!
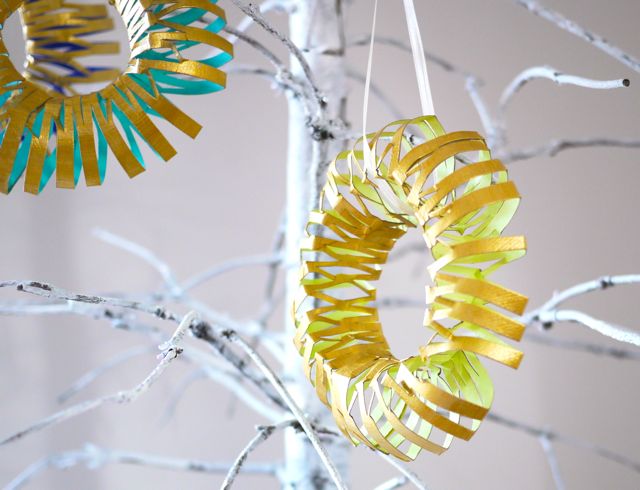
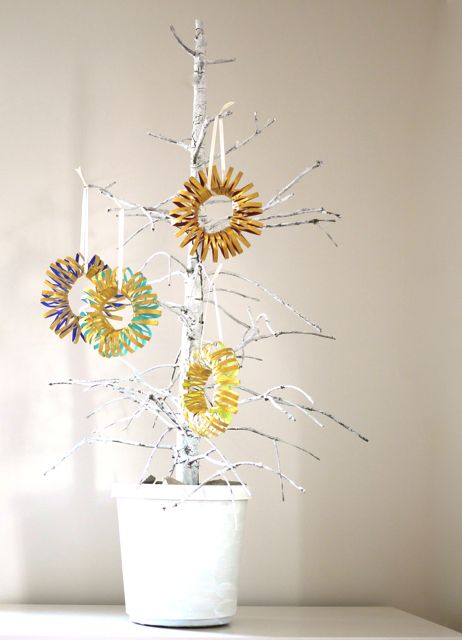
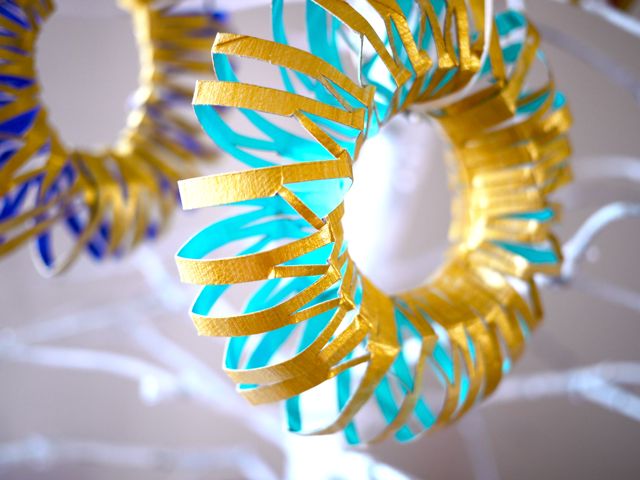
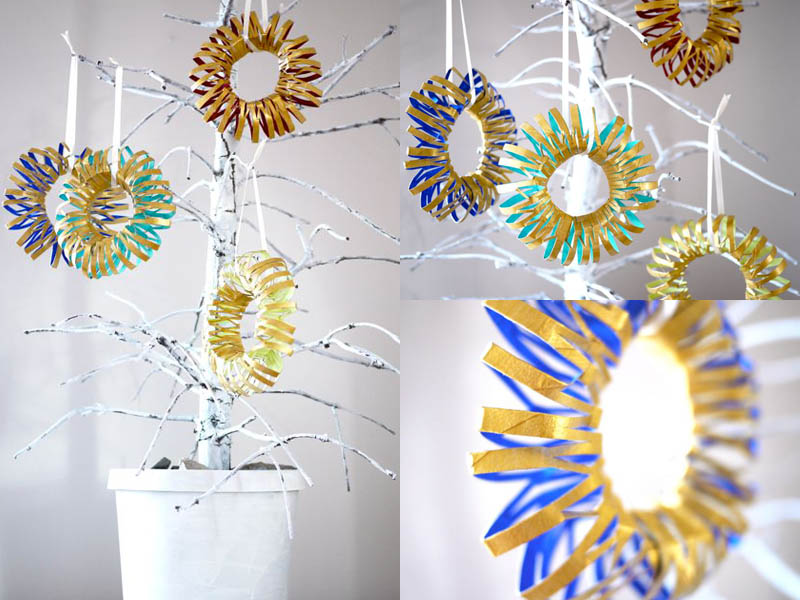
Here are your completed masterpieces… In an array of colours!


Time to get back to sleep? I’d say so… You deserve a rest!
You have yourself some pleasant dreams now.
P.S. I’ll be joining the CSI Project for this week’s Painted Holiday Challenge!
P.P.S. To see the rest of this series scroll down to the bottom of my Series page here!
thanks for the tutorial! i´ll do it. kisses
Wow!! Those look amazing! I love how the bright color shows through the cuts. Love these!!
Ces bons vieux rouleaux de papier toilette! C 'est pourtant toujours nouveau !
Outrageously pretty! I love the color inside, gold outside. Such a cool effect, what a fancy snippy craft! Hope you sleep tonight, secure in the knowledge you have given us another wonderful post of loveliness.
These are awesome, I will definitely be making some. Thanks so much for sharing!
Wow! Those are really really pretty!
beautiful tutorial
Oh wow these are sooo cool! Im pretty sure aqua and gold is the best color combo ever. Period.
AND these could be great and nifty and festive all year round! I wish I could think of a waterproof material that would work outdoors…I have a dead tree outback and would love to hang a cluster of these from the branches! Sooooooo pretty.
I bet you could spray polyurethane on them to make them work outside…
oH WOW another stunner Michele..love it and hope you managed to sleep afterwards lol
Hugs Suz x
They look great!
This is so nice!!really coool idea…inside color is looking awesome…overall the tutorial is described nicely!!!
At the same time , it is NOT simple again , how can I measure those inches Or quarter of inches:(
Bonjour DM!
Yes you, living in France, probably do not have inches on your rulers. Here in Canada we have both the metric and imperial measurements on ours… So, 1/4" is approximately the same as 6mm; I would not go smaller than that. You could go bigger and use 1 cm spaces instead and see where that takes you. Obviously I didn't use centimeters so I don't know how it will look but there is so harm in trying. Bonne Chance! Let me know how it goes!
These are excellent Michelle! I kid you not when I say that I was working on something very similar yesterday (wish I had taken a photo)—except I used a flat piece of paper and I was having a hard time keeping the strips attached to the opposite side. You were so much smarter by using the TP rolls and I specially love the addition of color to the inside. Awesome!
Of course ! thanks for the trouble ! Don't drink tea or coffee in the evening , I hope ? You can invent things during the day too , you know 🙂
Absolutely beautiful. The metallics make this project just soar.
Amazing what you can do in the middle of the night. Great tutorial and love the pop of colour coming through from the inners.
I like this idea for Christmas decoration! Maybe we'll try to make it ourselves in the children's puppet studio!:)
NO wonder you can't sleep if your brain can figure out how to cut stuff up and make it into such beautiful things – I can see why you just have to DO IT!
I was busy traveling back from Thanksgiving, so I forgot to tell you that I spotlighted your site yesterday. Love all your creative projects!
Good for you that you make something when you cannot sleep. Me, I usually get up and eat something. Not so good. 🙂
I love the ornaments, especially the bright colours paired with gold. They look great!
I love this idea! I'm going to make up a bunch.
I have insomnia too. It stinks on ice.
Wow, I love these. My son and I would have a great time making them. what I love the most is that you can't even tell these were made from a toilet paper tube.
Is it really P.Q?
Parasite,
If you are asking if these are really made with Toilet Paper rolls then the answer is YES. I'm not familiar with the term PQ. (Unless it means Province du Québèc. But I'm pretty sure that's not what you mean…)
I love your work – always classy.
xxh
Thanks for linking to Take-A-Look Tuesday over at Sugar Bee Craft Edition – I featured you today! – Mandy, http://www.craftedition.blogspot.com
Yes it is one term french but not very correct
I am sorry
Do you know, I've never made these…
How simple and how cute!
Please stop by and link this post up to Theme Party Thursday. It's perfect for our holiday theme.
🙂
Jami
Very cool! Eco friendly annnnd pretty…following you for more great makes.
Natalie :o)
LOVE these. My youngest and I have been making toilet holder snowflakes for a few years now. I think I will be adding this next year as a great memory/tradition. Thank you for sharing and inspiring!!
Hugs,
Regi
I also have performed an ornament from an empty toilet paper rolls. I will give an information on my blog about this (i will give a link).
Very creative and I love it. I do that too where I can't sleep and thoughts of creativity race through my mind. I think mine's probably because I don't have much time during the day to do the crafts I'd like to with work and my kids. I love doing crafts with them too and they will absolutely love this one. 🙂
thank you for telling how to made these lovely ornaments. I'm linking in tomorrows post at deze is ook leuk 🙂
these are just stinkin adorable and I mean cute cute cute~~! Love the bold color on the inside, makes it very fresh.
This is so clever, I love it! I'm featuring these ornaments on my blog today 🙂
http://www.diynewlyweds.com/2010/12/diy-handmade-christmas-ornaments.html
Is it too soon in our relationship to say I love you!!!??? 🙂
In my closet at school I have a huge trash bag filled to the top with toilet paper rolls and paper towel rolls. The bag never goes down…a couple of years ago we made rainsticks and I asked my primary age students to bring in paper rolls…they have never stopped bringing them in:-) The thing is that no matter what you make with a toilet paper roll with a primary student it still pretty much looks like a roll. But this, this is wonderful. I know it will require much help from me, but I think we can pull it off. Thanks and Merriest Christmas ever!
Awesome idea! Thank you!
And here my family was laughing at me about saving empty toilet paper rolls.
wow very cool ideas!!!
These are very cool, I especially love the colors. Will it work with 1 papertowel roll instead of 2 TP rolls?
I would be interested in knowing if anybody has a use for the medicine bottles that you get prescriptions in. I have collected a large amount of all sizes and hate to just toss them and would like some ideas anyone has. Your paper towel and toliet roll ideas are great.
I'm always trying to think of something to do with those, Sue! Right now I use them to mix my paints in. I hand paint shoes and often need special colors. The bottles are perfect for this because they seal nicely and keep the paint handy for as long as I need that color. There has to be other crafts we can use them for though! I have a whole bag of them, labels off and waiting! Good luck!
If you come up with ideas like this when you can't sleep, I'd say you should stick with insomnia. Love it!
WOW your artistic skills with the humble TP roll are truly awesome…….totally love these! I'm going to get cracking on a batch of these here in Perth Western Australia. Staying inside today in the cool air conditioning as it is stifeling hot outside……a great craft afternoon ahead for Moi.
Thanks heaps Michele you are such an inspiration.
x Zandra
love your choice of metallic on outside and bright colors on inside!
soooo… beautiful,especially on a silvery white christmas tree.My kids are really going to enjoty this!!Thanks michelle.
Such a lovely idea, even in February! I might make some red and pink wreaths and add a small heart or use printed Valentine's ribbon. =) I'm sorry about your insomnia. I have it as well. I crochet my best when I should be asleep. =)
Grazie sei bravissima i tuoi tutorial sono idee bellissime!!
Nice idea. I am also making these for my twig tree. They will even look good for any Christmas decoration