
It’s here. Did you notice? Spring has arrived. And while the flowers have yet to show their pretty faces, their time is oh so close at hand. But I’m terribly impatient. So I’m giving them a little nudge… Are you with me?
Come here.
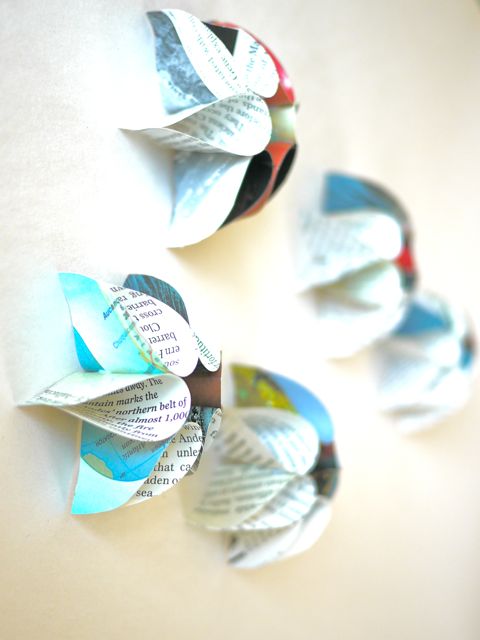
Cut up some of these…
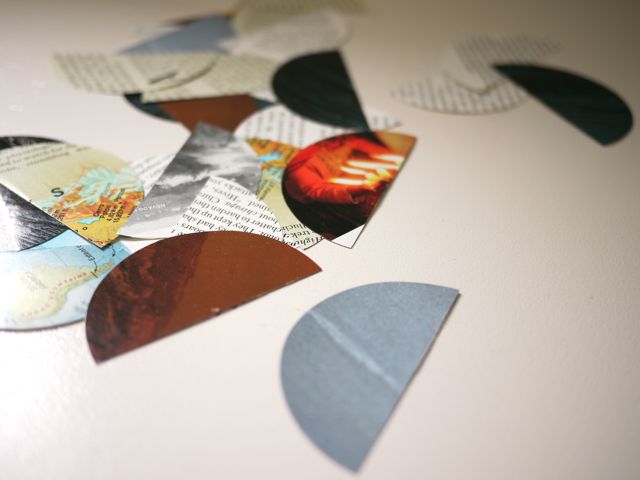
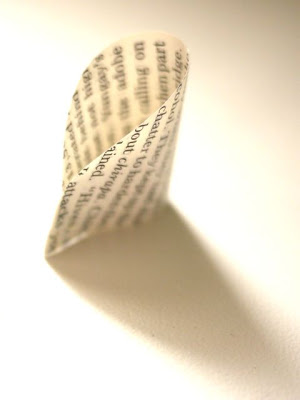
Make some of these… hee hee…
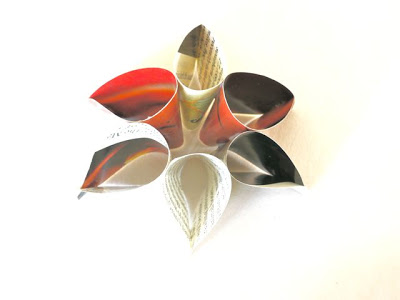


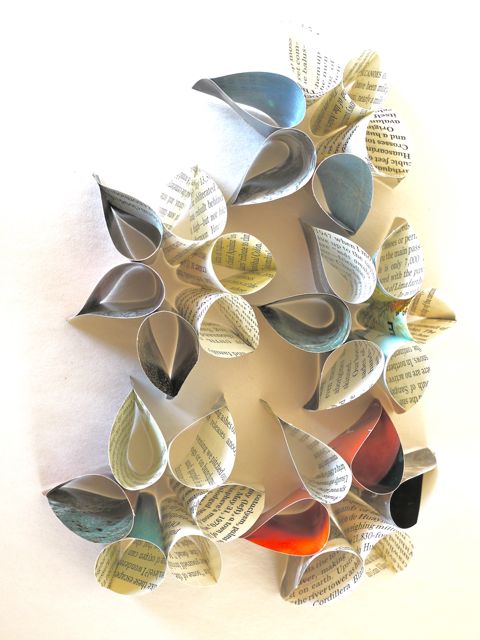
Glue a half dozen of them together to make these…

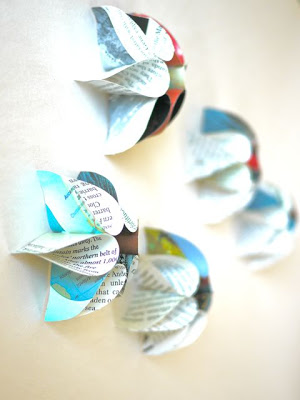
And hang them everywhere like this…
The garden varieties will follow suit in no time, I betcha.
In the meantime you have a lovely day, and I’ll see you again soon!
P.S. To see part 1 of the “Halve a Circle” Series, click here.
I hope you are right because I am very ready for spring. If all it takes is making a handful of these, I will get right to it 😉
Fresh, fabulous and fantastic!!
I LOVE Spring!!
Wow… it's so easy make them but the result it's fantastic!
So simple and lovely. Happy Spring Michele!
Light airy and springy – they are very, very pretty.
I love how being a half circle the shape themselves toward the wall. (Did that make sense?) So pretty Michelle! I cannot wait to see what you are submitting to Green Craft!
What an impact from some scraps of nuthin'!!! I just love the tapered shape of the petals. And the lovely gentle springy color combos!
creative… love how the words "pop out from inside the flower"
I gotta try this one:)
thanks
—
Daniela
http://isreview1.blogspot.com
I love your paper-flowers!
Petra
thanks so much all!
You make such lovely things with paper…I love it.
Just to let you know I've been reading 🙂
Just a quick note to let you know that a link to this post will be placed on CraftCrave today [22 Mar 01:00am GMT]. Thanks, Maria
They are so pretty and simple. Very spring-like!
I will try this for decorate for my dry branch…
Waooo..its such a smart spring effect..hmmm..you are always smart my dear!!!
Amazingly creative! And recycling magazines which is one of my favourite craft materials. I would like to make a reference to this on my blog (mardesonho.blogspot.com) if you don't mind. I'm just starting and you were one my inspirations…
Thanks Mar, you go ahead! Thank you for asking and best of luck with the new blogging adventure!
For sheer cleverness of idea, you are the best ! Simplicity and elegance wrapped up in one great idea.
Awesome! Can't wait to make some! =)
Fabulous…
I saw your link on Tatertots and Jello Linkup. I love these! Such a great idea. They look pretty easy to do! Thanks for sharing!
-Karli
http://www.dancingaroundwithkarli.blogspot.com
Wow, very creative! Looks awesome!
xoxo from Germany,
Vanessa @ {nifty thrifty things}
These are absolutely fabulous 🙂 Can't wait to try them… Just one question, however: how did you hang them on the wall? Any ideas and recommendations for attaching them will be welcome 🙂
how simple & adorable! can't wait to try making these!
-caroline
http://cwfrosting.blogspot.com
hi michele, missing you on craft schooling Sunday and hoping to see you again soon! xoxoxoSara
Hi Gingi, Michele here. To attach the flowers to the wall, I simply took a small piece of sticky tape, attached the end to one of the petals (on the inside) and then attached the other end of the tape to the wall. This makes it look like the flower is floating, and you can't see the tape. Hope this helps!
What a great idea!! I'll be featuring these on Thursday–please stop by! 😉
Wanted you to know I posted a link to this tutorial today on my blog.
Nancy Ward
PaperFriendly
http://www.nancywardcrafts.com
What I think is I'm glad I found your blog!! I'm a watercolor artist, but I love playing with paper , collages, small art journals, etc.
I'll be back for more ! BJ
thanks so much Barbra Joan, you are most welcome to drop by anytime!
Wanted you to know I posted a link to this tutorial today on my blog.
Nancy Ward
PaperFriendly
http://www.nancywardcrafts.com
Creative ideas. thanks alots
Love this tutorial. Link it up to our Party Tutorial Contest for a chance to win some fabulous prizes: http://www.purejoyeventsblog.com/2011/09/party-tutorial-contest-3.html
I work with Seniors (85+) who have many limitations to say the least but they love creating art. Your craft will not only be do-able by some of them but (and most important) they will love the end result. The only change for us is we will be mounting the petals onto card stock and adding paper stems & leaves. Oh, this will be so much fun.
Finding arts & crafts that require limited skill and end up looking great for ADULTS (not kid look) to be pleased with is a challenge. This will be a joy to do because I can already hear the OH'S & AH'S. Thank you.