
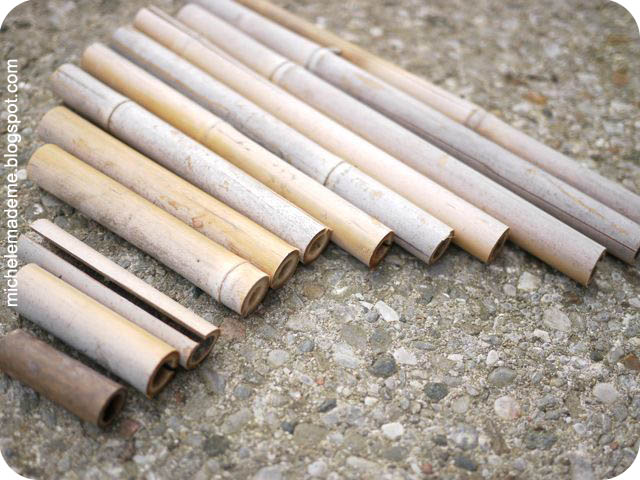
My husband set aside a few days last week to clean the garage. He’s a truly great man. Had you seen our garage before the clean-up you’d think so too. It was a colossal mess before he swooped in. He wrangled that eyesore into shape, and while he was at it, he managed to dig up a few goodies, namely a few old stakes of bamboo that were still in decent shape. I decided to snag them for my Point of View project, hee hee: the summer time chime.

Now I know how clever you are. You? You don’t need a tutorial for this. You could make this chime with your eyes glued shut and both hands sticky-taped behind your back. Nevertheless, I will walk you through what I did.
Tutorial: Summer Time Chime
You will need:
- A bamboo stake or two
- A stick (like, from a tree)
- A drill with small drill bit
- A handsaw (I tried the miter saw but it shredded the ends of the bamboo so I used a handsaw which worked like a dream.)
- String
- Needle
- Acrylic paints and paintbrush
- Sharpie
- Varnish
Using a handsaw, cut up your bamboo into progressively longer pieces. I cut my pieces 3, 4, 5, 6, 7, 8, 9, 10, 11, 12, and 13 inches long.
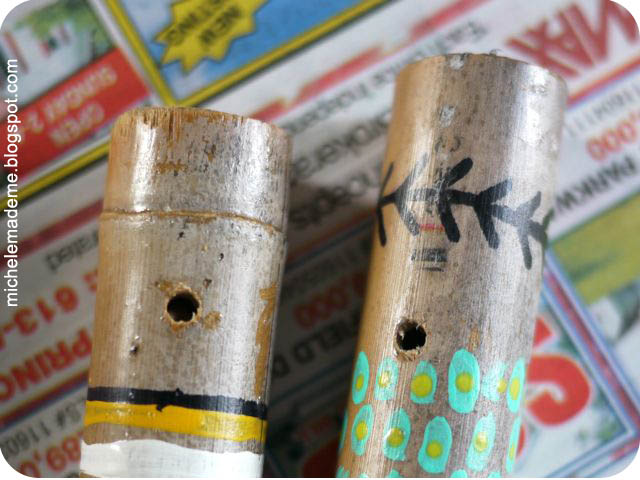
Paint ’em! Starting with the lightest colour and getting progressively darker, free-hand some designs on your bamboo pieces. Do whatever you like: add stripes, dots, blobs, lines, waves, leaves, the Mona Lisa, whatever… Once you’ve applied all your paint colours and allowed them to dry, add some details with a Sharpie. Apply a few coats of varnish over the bamboo pieces to make them weather resistant.

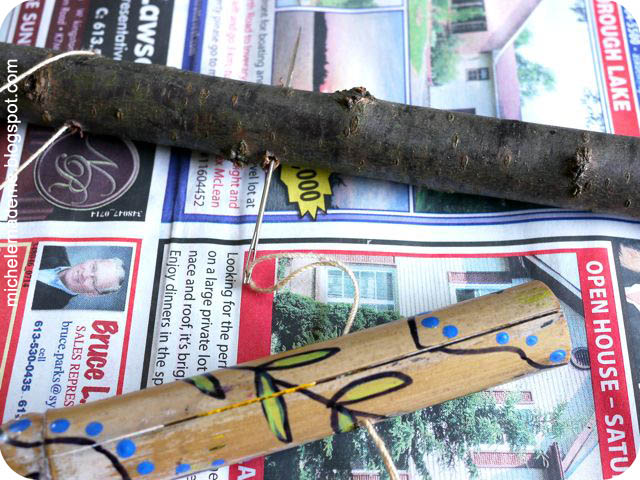
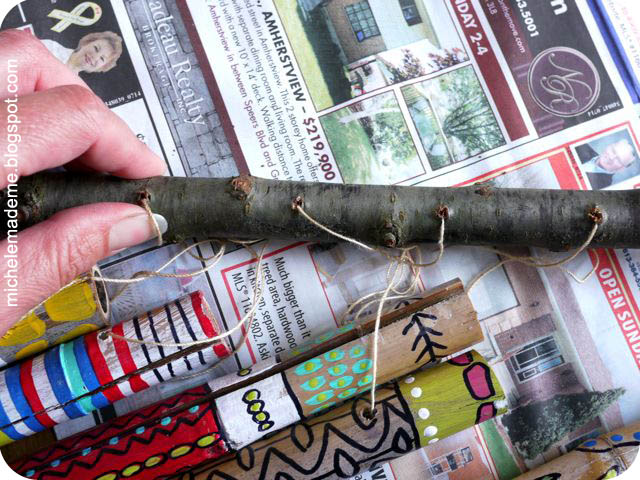
Drill holes every 1-1/2 inches (4 cm) in the stick to accomodate the string hangers. The holes in the stick are not too far apart. They have to be the right distance apart to allow the bamboo pieces to hit each other in order to produce that satisfying “bink bonk, bonk bink” sound. If your bamboo is smaller or bigger you may have to adjust the distance between each piece. It’s a balance.

Now drill holes through one end of each bamboo piece as well.
Use a large needle to facilitate the stringing process. Thread your string onto the needle. Slipping your threaded needle through the hole in the stick and then the bamboo, attach each bamboo piece to the stick. Knot the ends of each piece of string.
And that, as they say, is that!
Hang your bamboo chime where it can swing freely and listen to its sweet sweet music! It really is too pretty to express in words…

For all the details on all Points of View and to join the linky party, check out this next post.
I’ll meet you over there!
I love that idea!
Oh, it's lovely. I think my kids would like to make something like that. I will have to send my husband out to clean the barn and see if he comes up with some bamboo 🙂
Seriously amazing and beautiful project, Michele. I love the colors and all the little details you added to make each piece of bamboo unique. What a clever idea for a wind chime. I love it!
I love this and so would my girls!! Just rings summer. It is a great use for bamboo stakes.
What a beautiful windchime! Does the wind blowing over the tops and bottoms also make a "flute-like" sound? I bet these are so much more soothing than the clangy metal ones!
I'm glad we were both able to join in this time around!
Michele- this is glorious! I love the colors and the sounds must be heavenly! I am thrilled to my toes to have you join in with us this month!
xoxo,
Amy
This is absolute fun!
We have lots of bamboo plants in the garden and I have put so many sprouts in the biological waste bin. They would make some wind blo away joke that the sprouts I cut could have well provided a fishing shop. I will save them now to make a windchime (or a pan flute…)
I love this so much I might go clean my garage to see if I can find some bamboo hiding there.
these are just amazing..i love the colors & nice tutorial..thank u so much honey 🙂
Love this project and your sense of humor! If you craft you must have one!
Oh, and loved this so much, just put you on my bloglovin list 🙂
Masz świetne pomysły. Robiłam różne rzeczy z bambusa, ale to nigdy nie wpadło mi do głowy.
Szkoda tylko, że nigdy nie komentujesz.
Its like a rainbow xylophone in the sky!!! For some reason it also makes me think of those funky Indian totem poles, a little. Very cool!
These are beautiful! Have you ever hung the bamboo unpainted? Is there a difference in the sound? I have often wondered this. And I love bamboo, too! Thanks for posting!
Just a quick note to let you know that a link to this post will be placed on CraftCrave today [23 Jul 01:00am GMT]. Thanks, Maria
C'est une très jolie réalisation ! j'aimerais l'entendre aussi. Je vais m'en fabriquer un très vite. Merci de nous faire profiter de vos très bonnes idées !
Isac
Truly beauteous! What you did with an old garden stake!!! I love the sound of bamboo chimes – and yeesh, I have a huge bamboo grove in my backyard and have never once crafted with it! Thanks for the inspiration, Michele!
Η ιδέα σου φοβερή! Να είσαι καλά και να περνάς καλά! Φιλιά και την αγάπη μου!
Love this idea! It looks so pretty and I bet it sounds really great
I wonder where I can scrounge up some bamboo as I'm lacking a wonder-filled garage… hmm.
This is so cute! I love that you hand painted it. You did a wonderful job.
Next time wrap tape around the bamboo before you cut and it will keep it from splintering 🙂
Love your blog!
Ali
http://www.foundintheali.blogspot.com
Another great tutorial! I love this wind chime so happy and colourful!
Another great set of wind chimes, whats the sound like on these
Art For Little Hands said:
We saw those stakes at the dollar store too and did the same idea only we didn't take ours apart.http://www.art4littlehands.com/2011/07/garden-chimes.html
My kids loved doing it, but today I went out to the yard and noticed that the paint was gone. Stupid me, I used kids washable paint. Ooops. I think I will revisit and make some more. I love your designs on these. I will have to make some myself instead of just having the kids make them. love this.
okay, WOW.
I am crazy for both bamboo and wind chimes, so seeing this project is a real treat. There are lots of people who wind up with too much bamboo (anyone who has it) and would probably love to share. I am wondering if the bamboo cracks?
Bamboo wind chimes have a pleasant, harmonious tone that adds charm to any space. They are softer sounding than metal wind chimes, and so produce a more earthy effect.
What a wonderful idea for soothing sounds outdoors. Such a nice craft for all to do together as well. I just love the treasure & wealth of ideas that sprout up in here 🙂
ilove your idea it is so beautiful
Am going to make this with a student who loves to craft.
Looking forward to it thanks so much for sharing.
Thank you SO much for this post. We're going to be using this design for our university's Village Building Convergence project 🙂
so Adorable! Simple, quick and green : )
love your one so much we made one today, the result is here with your link:)
http://www.craftybunch.wordpress.com/2013/05/11/wind-chime/
🙂
This is sooooo inspiring!!! Super creative Michele!! 🙂
My son and I made this for his babysitter as a birthday gift… She said it was the best birthday present ever!! And it was a great activity to share with my son. 🙂 Th anks for the idea.
you are awesome!!!!!!! you have inspired me today !!!YAY!!! now i want to make one ….thanks for your artsy spirit u are my muse girl….