
I wish you a Merry Christmas in July!
Sing it with me!
I wish you a Merry Christmas in July!
Are you singing?
I wish you a Merry Christmas in July!
I can’t hear youuuuu!
And a Happy New… um… cough…er… DAYYYY!!!…
Lovely. Very nice.
Let’s make some trees, man.
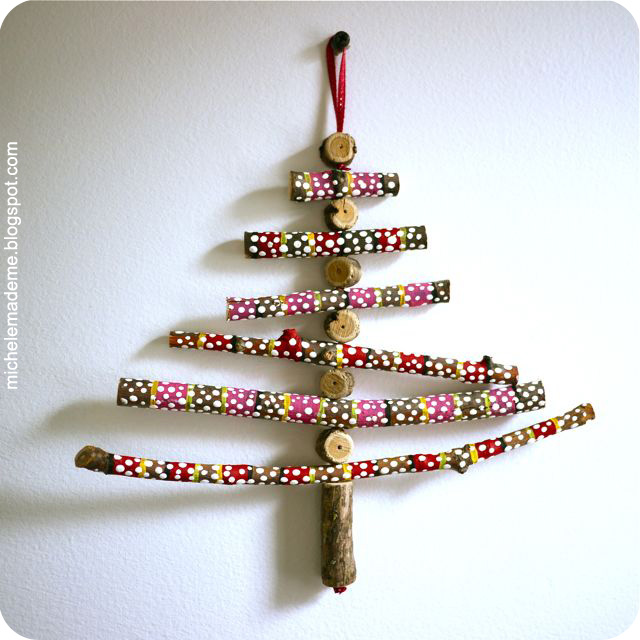
Tutorial: Twiggy Christmas Trees
You will need:
- a few twigs
- handsaw
- drill with small bit
- ribbon
- scissors
- large needle
- sandpaper
- liquid acrylic paints (optional)
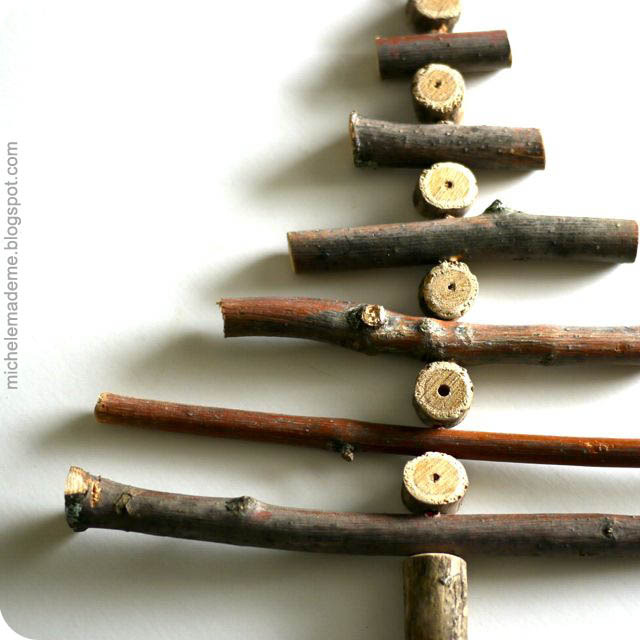
1. Using the handsaw, cut your twigs into progressively smaller pieces. No need to be exact. Trust yourself and just wing it. Also cut several stubby bead-like pieces for the branch spacers.
2. Place them as in Photo #2 to make sure they all look good together. Trim any pieces that may be too long.
3. With the drill, drill holes into the centers of the twigs. Try to find the center of balance of each piece before you drill to ensure that both sides are balanced. For the bottom-most trunk piece, drill a hole down into the heart of the piece.
4. Sand all the ends with fine sandpaper.

5. Cut a piece of ribbon that is 1-1/2 times the height of your tree. Thread the ribbon into your needle. Starting with the bottom trunk, thread the ribbon through all the tree pieces leaving a tail hanging out the bottom.
6. Back at the top, turn that needle around and head back down the top three pieces leaving a loop at the top.
7. Making sure you have a nice long loop at the top, pull the end of the ribbon out between the third and fourth pieces and tie a knot as in Photo #7. Trim the excess ribbon end at the knot.
8. Nudge all wooden pieces together, slipping the knot inside one of the pieces to hide it. Make a large knot at the bottom end. Trim the excess ribbon.

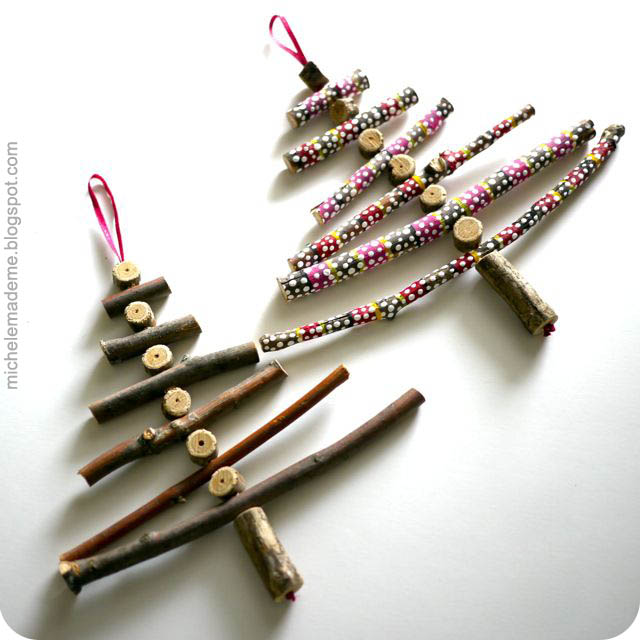
9. (Optional) If you’re a fan of colour, beautify your trees with paint! Before assembling your tree (which starts at #5 by the way), paint all the twiggy pieces using liquid acrylic paints. I chose to go nuts with the stripes and polkadots but you can paint yours however you like. Get creative and make them one-of-a-kind spectacular!

See? Here’s the pretty polkadotted one!
But you may like it “au naturel” if that’s the sort of thing you go for…
Me?… I’ll take one of each please!
Merry Christmas in July! So glad you could celebrate with me. Now have yourself a restful weekend!
Edited to Add: Visit Be Different Act Normal today! I have the distinct pleasure of guest-posting. Thanks so much for having me Lori!
I love them! I am definitely going to have to borrow your idea! Thanks for sharing!
Those are so pretty Michele. Fab idea.
A x
Love it! How do you hold the spacer pieces & drill w/p getting your fingers?
Oh Michele these are soooo cute!!!
I have collected quite a number of sticks on the beach now can't wait to make something. Will definitely try this!
Yes, one of each for me too. Those are great. I love Christmas decorations in particular that use natural materials. Merry Christmas in July to you too!
How cute! Merry Christmas in July to you and yours. Such a lovely idea for a tree – Hugs Nat
Hi Laura,
I just took it easy and went real slow. However, now that I think about it, you could drill all your holes into a larger twig before cutting, and then cut the spacers from there. That would be much safer, hee hee!
Great question! Have a lovely day!
These are really pretty. What a great gift!
Vanessa
My backyard is always littered with twigs so I have plenty of raw materials to make lots of these. I can't wait to make some. And the cool thing is you can make them any size. Little tiny for a tree ornament, but a larger one would look great on a door if you want something besides the traditional wreath.
Thanks!
These would make great ornaments on a woodsy tree! I love the look of them- both ways!
xoxo,
Amy
All I want for Christmas is a Twiggy Tree!
i like it
super cute idea! Xmas presents anyone?!?!?!
Mh… I am also thinking about christmas… and a lot of my friends did too… we think this may be due to the really cold summer in germany this year… and that it is strange how our brains start their first chrsitmas thoughts as soon as it gets grey, rainy and colder 😉
I absolutely love your trees! I am alredy thinking about making some tiny ones for ornaments or to use as gift tags 🙂
What a lovely crafty idea!
Just on my way out to look for some twigs.
Love to do this with my girlie.
Merry Christmas in July to you, too! These must be in the homes of the previously introduced twig people… (which BTW I saw on One Pretty Thing and on Craft Magazine!!!! Way to go M.
How fun, Michele! This is a great holiday craft. Hey just wondering if there is a reason the divider guys are drilled through the heart and middle sideways? I like the look of the holes in the center of each – is it for added je ne c'est Quoi?
I am absolutely, positootly in love with the polka dotted tree, although I'm a little reluctant to even begin entertaining the idea of Christmas! 🙂 new follower here! going to pin your tree on pinterest!
http://pinterest.com/thingswithwings
come visit us sometime!
http://thingswithwingsartjournal.blogspot.com
good job!
how cute, love this idea, really drilling the tiny branch is a Question but thanks for asking Laura & your reply!! good 🙂
Sweetness and so – not just Christmas…
These are fabulous! I love how you come up with ways to make beautiful decor from simple items.
These are so glorious and sweet! Love them both ways!
Just a quick note to let you know that a link to this post will be placed on CraftCrave today [30 Jul 01:00am GMT]. Thanks, Maria
Cute. The painted one looks aboriginal inspired!
Really love these!! Have bookmarked this for later use! Thanks again for a great idea and tutorial!
Priceless! Wonderful lol
Very funny! I will certainly make some, for Christmas in December 🙂
Ooo, I really like the painted twiggy tree. So pretty.
Wow! I sooooo don't need a new project but I sooooooooo have to make a bunch of these. Told hubby about them as we drove home from church today. Said I needed twigs as soon as possible so really hoping he'll help out in that and the cutting since i'm a super chicken with all power tools except my little dremel drill! Thanks for this really adorable ornament
Adorable, Michele 🙂 I love the polka dots. I can imagine these in several different sizes displayed together. Great project!
Great project – I'm collecting holiday ideas this summer, so it's perfect 🙂 And I have a big pile of sticks from some recent landscaping work….
Love the idea. Will need to buy a small bit for my drill. Perfect to let the kids decorate.
Yeep!!!! These are amazing!!!! What a great idea. I'm crazy about the polka dots, but I'm thinking of a dozen people I know who would love the earthy/twiggy one for their front door. This could also be so cool on a giant basis too. My head is swirling, and not just with Xmas Carols (they'll be stuck in there the rest of the week, btw!)
lovely idea!!!!
This idea is definitely going in my book of things to do,I love it.I think tiny ones would be lovely to use as gift tie ons in place of bows,how unique and sooo crafty.
What a great project! 🙂 I've featured this post on Craft Gossip here:
http://homeandgarden.craftgossip.com/twiggy-christmas-trees/
If you would like a "featured by" button, you can grab one here:
http://homeandgarden.craftgossip.com/grab-a-craft-gossip-button/
Lovely! I especially heart the spotty one! Will try and make some with my daughter.
These are so beautiful! You are so inspirational!
Ooh, what a lovely idea !!!
This is a great way to use some of those zillions of branches I'm always picking up in my yard! I love the rustic look. Thanks for the idea.
Visiting from Totally Tutorials. I would be thrilled if you stopped by My World and linked this to my Christmas linky party.
http://myworldmadebyhand.blogspot.com
Adorei o texto e as árvores, obrigada.
super great, thank you for sharing with us. Best wishes from janine (germany)
SUPER!!!!
J adoooorrreee ce blog plein de créativité avec des petits bouts de rien! BRAVO!!!!
Yes SUPER
I made this trees with my deafblind clients. See the results at my blog!
Awesome project! We'll be featuring this as part of our 12 days of unique Christmas decor tomorrow. Feel free to stop by to see it an grab a button. http://www.TheRoosterAndTheHen.com
Really cute idea..I made something very similar w/my family this past Christmas. We had "old" cinnamon sticks that were not gonna cut it for baking purposes so we "re-purposed" them into mini wind chime-like ornaments..drilled holes, strung w/contrasting ribbbons & hung on the tree..super easy, & gave a "nature"-al look to our tree..fresh cinnamon too would be amazing during the holidays.. 🙂
And DONE! thanks for this made my july christmas eve very fun!
Ace, I was just looking for Christmas ideas… in August. this one is perfect! thanks
Just stopping by to let you know I featured this project on my Christmas tree craft collection.
Please grab a featured button from my side bar when you get a chance. Thanks
http://diycraftyprojects.com/2012/11/50-diy-christmas-tree-craft-ideas-collection.html
que bello trabajo y tan original
Terrific ornament! Share your ornament (or more) on our Linky List to get exposure for your own blog and share with your community. http://muddymonkeys.me/2012/11/28/wanted-homemade-christmas-ornaments-for-children-and-kids/
Help! I'm in the process of making these adorable twiggy trees and I cannot for the life of me get the spacers cut! What tool did you use? Any tips or tricks? Thanks!
Hi Unknown,
As noted in the above tutorial, I used a small handsaw to cut everything including the spacers. I just stood on the twig which I'd laid down on my cement stoop with the end sticking out into the air and cut little bits off with the saw. That's it. Worked like a charm and very quick!
Hope that helps!
Merry Christmas!
I used a chop saw…and I still have all my fingers!
wonderful …. I'll try…thanks :-))))
I LOVE THIS!!!
those are very pretty and i will love to try them and thanks for posting it
lol these are really cute. and I am more in the mood to make them than I usually am at crimbo. I think I would like to make loads to make a display. xx
Too cute, Love your pinspirational project! I have pinned this and also blogged it for my Walkabout Wednesday series. Twiggy Inspirations post here
Hugs, Antonella 🙂
I love it–Hope you don't mine–I always pick 5 different crafts every year at Christmas time to do with the grandkids–And this is going to be one of them–Ty for sharing this
ça me paraît d'actualité, ça ! Je retrouve l'idée … Thanks , Michele!!!
I love your polka dotted one so much that I would like to reproduce it as big as a really Christmas tree but hanging from the ceiling! I might try soon!