I’ll get directly to it today. Visitors are on their way and my abode needs an overhaul NOW-ish. I’m going for the “illusion” of clean. Wish me luck. Here’s what the boy and I got up to yesterday!
Tutorial: Kids’ Futuristic Construction Set
You will need:
- Cereal box
- Foam meat tray
- Egg carton
- Paper bag (or whatever paper you have on hand)
- Wooden skewers
- Pair of scissors
- Wax crayons
- Pencil
- Sharpie
- Hole punch
- Assortment of round things to use as templates
- PVA glue
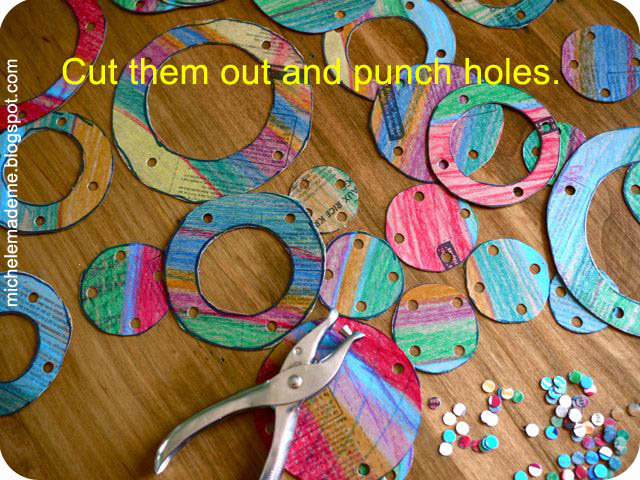
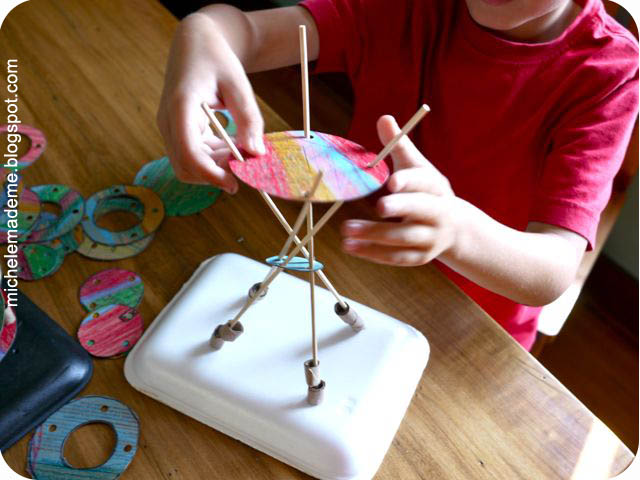
Take your cereal box, open it up and draw out a goodly amount of circles and rings using round things (bowls, cups) as templates. Trace them all with your Sharpie. Colour them in with the wax crayons. There are no rules here. Let your child go colouring-mad!

Cut out all the circles. Use a hole punch to punch out several holes in each piece.
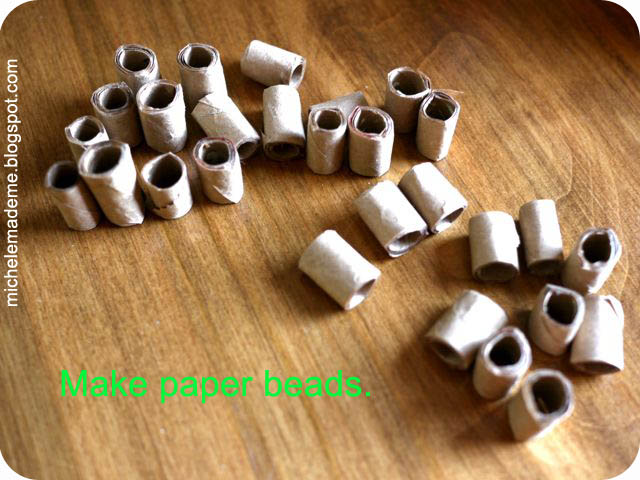
With a paper bag (or whatever paper you happen to have around) and PVA glue, make paper beads by rolling your paper up into long tubes and cutting the resulting tubes into sections like so.
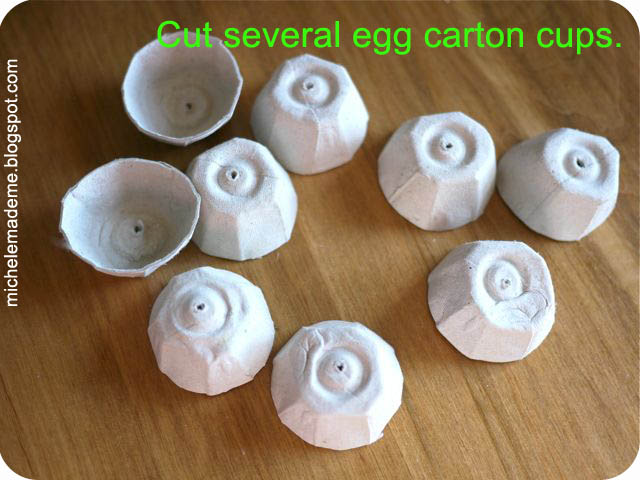
Cut the cups out of an egg carton.
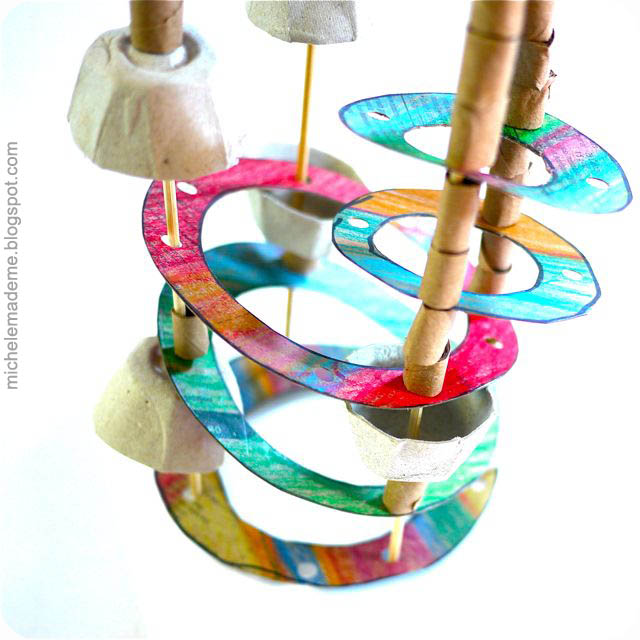
Using a foam tray as your base, poke the wooden skewers down into it, pointy end down.
Your little architect now has all the elements necessary to construct his buildings of tomorrow!
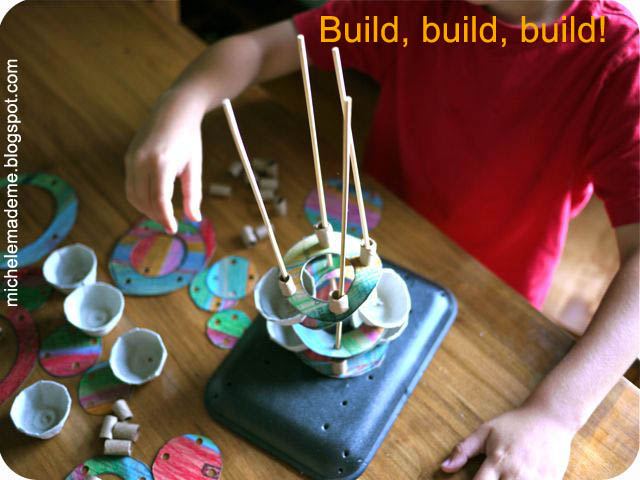
Go ahead my little one, build to your heart’s content.
Look at him. He’s happy. He’s busy. This is the life.
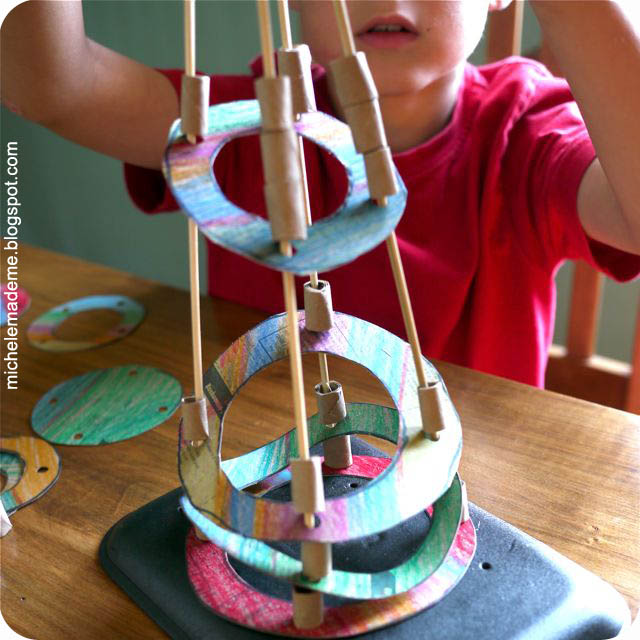
We had fun with our simple construction set. I said we, yes. I’m not ashamed to admit that I played with it too. That’s right. You’re jealous, aren’t you? Well… go on then. Make yourself a whole glorious set, and go to town creating some nifty, state-of-the-art edifices!
Alrighty, must clean now. You have a lovely day, and I’ll see you again on Friday!
What a brilliant idea. Thanks for sharing it.
Hugs,
A x
Isn’t it wonderful to be young and enjoy it so much to play like you and the boy do!?
I just finished my illusion of clean! Happy days!
Using paper beads as in play construction is so brilliant. I love how your minds work (the foam tray base is also clever!)
Oh.. Wow! This is definitely a must-do! Jacob (my son) would love this! I love it too! Great use of recyclables Michele! A fantastic project!
It's great kids activities. I will try with my DG when we visit them next week. May I ask if the boy has any bought toys? My GC don't have any of those big plastic toys – I love everything you and the boy do – hugs Nat
beautiful. I love it. Your ideas are always so fresh. I would like to do this and share on my blog with a link to yours. Are you okay with that?
What fun. I know my kids would love playing like this too. 🙂
Good luck with creating the perfect illusion!!
So beautiful and frugal! Love the meat tray base, it's perfect. Also, I love that he can color while you work on paper beads, etc. – great engrossing activity!
This is so great!! Looks like you two had a lot of fun with this project. The nice thing is that you can keep creating different things for hours. Love that. Hugs Ariane
So inventive!
This is spectacular!! We featured your futuristic sculptures/playscapes at our blog, MPM School Supplies Blog! We were sure to give idea/photo credit, as well as a link back here, but we'd love for you to take a look at it!
Let me know if there are any problems! Thanks!
Kayla Johnson
"The boy" just has to be one of the luckiest young men on the planet! i am sending a link over to another lucky young man in Sweden who i believe will enjoy this!
Adelian said: I tried to make one with my cousin and they are fun to make! Thanks for the fun craft idea!
Adelian 😉
whoa!!!!! so cool! I love how the ingredients could be made by ten different kids and come up with ten totally different sculptures. Endless possibilities!
Just a quick note to let you know that a link to this post will be placed on CraftCrave today [25 Aug 01:00am GMT]. Thanks, Maria
I love how your minds work (the foam tray base is also clever!)
Love this, it's like the upcycled version of tinker toys.
Una idea genial!!
Saludos:)
I hope the boy knows how lucky he is to have a super fun and creative mom like you 🙂
This is fabulous. I love me some recycled materials, and you've made your trash look glorious. Yes, I do need to make our family a little set. Well done!!
This is wonderful! I;m pinning this!
Pinning this and definitely doing it soon!
What a great idea!!! My kids will love that