• Skip to primary navigation
  • Skip to main content
  • Skip to primary sidebar
  • Skip to footer

Michele Made Me

One birdie's attempt to figure things out. Oh, and crafts.

  • Home
  • Blog
  • About
    • Press
  • Shop
  • Quilts
  • Tutorials
    • Christmas crafts
    • denim
    • fibre
    • home and garden
    • kids
    • miscellaneous
    • paper crafts
    • plastic crafts
    • seasonal crafts
    • sewing
  • Series
    • And Then There Were Tree
    • Candy Wrapper Chain
    • Drop-Dead Denim
    • Feast of The Flower
    • Five Little Things
    • Halve a Circle
    • Junkmail Snowflakes
    • Loving Is Listening
    • Merry Little Christmas Ornament
    • My Tiny Brain Wave
    • Old Towel New
    • Ornament-ED
    • Situation Christmas Ornament-ation
    • The Box Chain
    • The Great Tissue Box Challenge 2010
    • You Guest It
  • Contact

Series 7 – Ornament-ED: Twig ‘n Bead Trees

November 12, 2011 by Michele

Welcome to Series 7 “Ornament-ED” Part Trois! I hope you’re enjoying my little Christmas ornament series. I’m making hangy things like they’re going outta style over here. I’m up to my bushy eyebrows in twigs and glue and paper and other stuff I won’t mention – I don’t want you to guess what I’m up to next. There’d be no fun in that now would there? And do not worry, I will clean up eventually. Sometime pre-Christmas perhaps? That’s the plan anyway… Oh but let us not fret over a petite mess here and there. Naw. What do you say to a little craftiness right here, right now? Yes, OK.

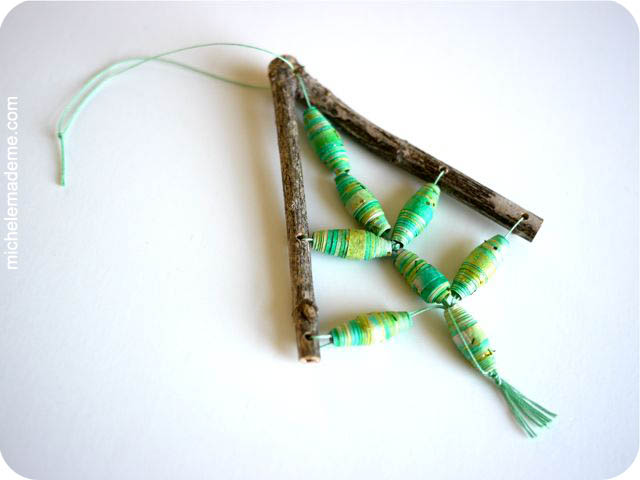
Tutorial  ❉  Twig ‘n Bead Tree Ornaments


You will need:

  • Beads (to make them you’ll need: paper, pair of scissors, skewer or drinking straw, and glue)
  • Twigs with V shaped crotches
  • String
  • Pair of scissors
  • Handsaw to trim the twigs
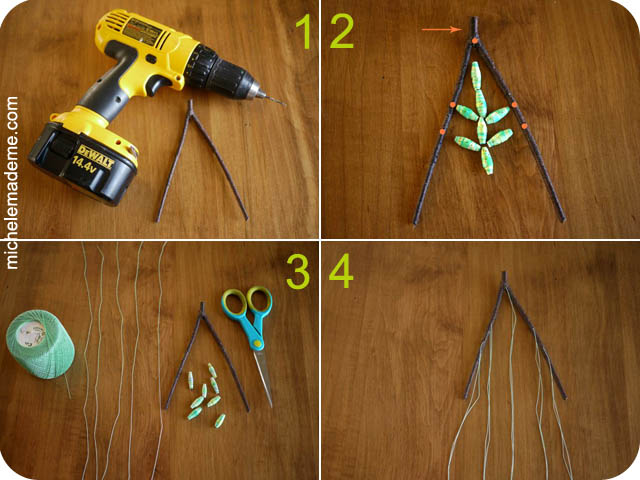
  • Drill with tiny bit
  • Large-eyed needle

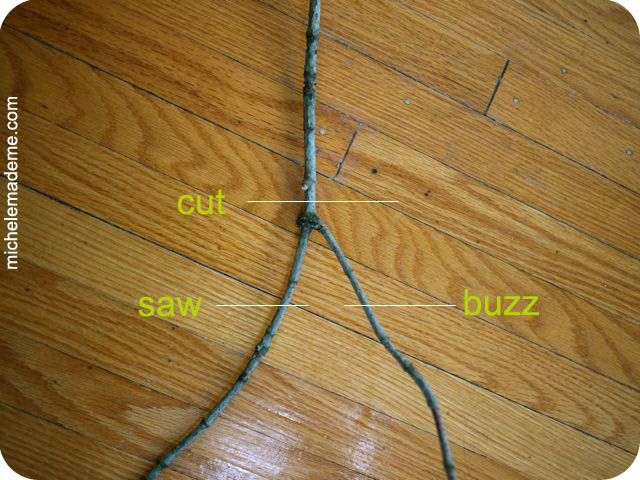
Begin by scrounging around the neighbourhood for a few fallen twigs-slash-branches with v-shaped crotches as shown below. Trim off the excess wood according to the diagram. I’ve trimmed the sides of my “V” (technically, it is an upside-down “V” but I’m going to call it a “V” to keep things rolling…) to approximately 9-inches long. More will be taken off later on.

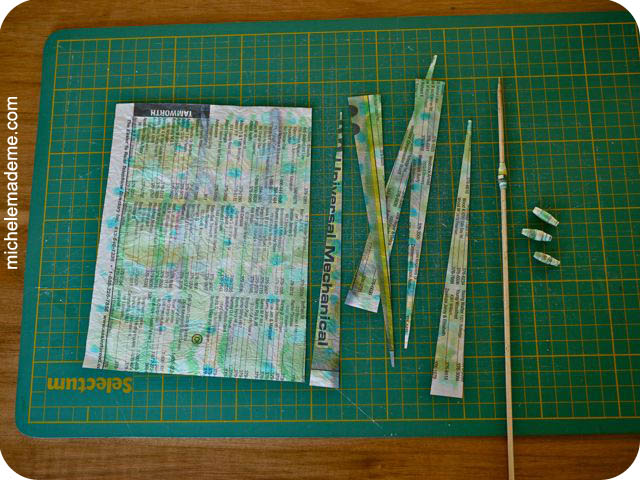
Next, roll up some paper beads. You know how to make these right? Here’s a tutorial courtesy of Paper University just in case you don’t. I used 8 to 11 beads for each little tree but it really will depend on how big you want your ornament to be. Go with the flow, roll with the punches, use as many beads as you like!


Now let’s get to down to the meat and potatoes.
1. Grab your drill fitted with a tiny bit and your V twig.
2. Arrange your paper beads in a little tree shape within the V. You want to mark your twig with dots adjacent to the beads. You will locate your drill holes at the dots. You want an additional hole in the top and side of your twig to accommodate a hanger (where the arrow is pointing). Drill the 6 holes as shown in #2.
3. Cut five pieces of string. I cut mine approximately 14 inches (36 cm) long.
4. Insert 1 piece of string into each hole pulling the string through each hole until it is doubled, as shown in #4.


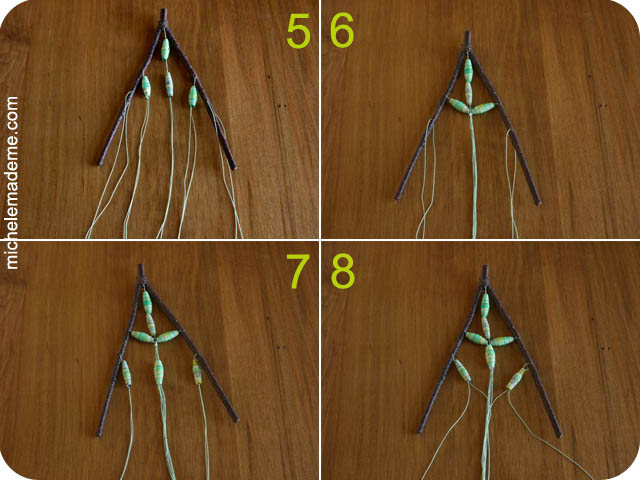
5. Thread paper beads onto the three central doubled strings as shown.
6. Tie a knot in the collection of strings at the base of the central bottom bead.
7. Insert 3 more paper beads as shown in #7.
8. Bring one string from the base of each side bead into the center.

9. Again, tie a knot at the base of the central bead incorporating one string from each side bead in the knot.
10. Using the two strings set aside in 8, tie a small knot above the other big knot you just tied. Turn the ornament over and using those same two strings, tie another small knot above the big knot. Slip a final bead up the center strings.
11. Bring those two side strings down and around the final bead and tie knots front and back as in #10.
12. Thread those two knotty side strings onto a needle and pass the needle up through the final bead to hide the two strings. Trim the excess.

13.  Trim the ends of all strings at the base of the final bead, leaving a small decorative tassel. Using your small handsaw, trim any excess wood from the top and bottom of your twig. Finally, add a string hanger at the top.


Lookie there, a mini beaded country Christmas tree ornament! Ain’t it sweet?
Here’s my giant hand and morose face doing a closeup shot. Smile much?


You have a beautiful weekend. I will be back here on Tuesday and hope to see you then!
Earlier installments in the “Ornament-ED” series include ☛
  • Spiral Notebook Binding Wreath Ornaments
  • Twiggy Skate Ornaments


Filed Under: Christmas crafts, Christmas crafts, miscellaneous, nature and wood crafts, Ornament-ED, paper crafts, paper crafts, Tutorials Tagged With: Christmas ornament, tutorial, twigs, wood crafts

Previous Post: « Series 7 – Ornament-ED: Spiral Notebook Binding Wreaths
Next Post: Just a Little Something I “Whipped Up”. »

Reader Interactions

Comments

  1. CREATIVE MIND says

    November 12, 2011 at 12:31 pm

    How cute 🙂 I try these paper beads twice but i dont know whats wrong here so i always fail in making these in a perfect shape..your smart tree ornament is perfect !! Have fun 🙂

  2. Pacas says

    November 12, 2011 at 12:42 pm

    Every time I see your creations I realize that I get a smile on my face 🙂
    Keep doing it, please!!!
    Kisses from Porto, Portugal

  3. Michelle L. says

    November 12, 2011 at 9:47 pm

    Just the most charming thing a person could ever do with a twig! Made me squeak!

  4. Ariane says

    November 12, 2011 at 10:56 pm

    I love these!!! Gorgeous!!!

  5. Maria's Craft says

    November 13, 2011 at 1:55 am

    Just a quick note to let you know that a link to this post will be placed on CraftCrave today [13 Nov 02:00am GMT]. Thanks, Maria

  6. Catherine says

    November 13, 2011 at 6:48 am

    So very pretty! Love combination of the twigs and beds.

  7. nicolette at dutchcomfort says

    November 13, 2011 at 2:36 pm

    This is soooooo gorgeous!

  8. JULITA says

    November 14, 2011 at 12:26 am

    Oi

    É maravilhoso o que você faz. Adorei!
    Parabéns!

    Julita (Belém/Pa/Brasil)

  9. Melissa says

    November 14, 2011 at 1:02 pm

    Sweetness…

  10. pam says

    November 15, 2011 at 4:28 am

    This is the most beautiful and creative way to use paper beads I have ever, ever, ever seen! I still remember learning to make paper beads – my Great Grandmother taught me. I would play with them for hours – stringing and unstringing and stringing again.

    I have been tempted to play again, but so much that i do these days is blog oriented and there are tutorials aplenty out there. BUT THIS – OMG I am so making paper beads again and hope to make a twig ornament just half as pretty as this one.

    thank you so much.

  11. Michele Pacey says

    November 15, 2011 at 2:48 pm

    Creative Mind: The beads can be a little bit tricky but you can remedy that by wrapping them around a plastic straw or as I did, a wooden skewer. It really simplifies the whole process!

  12. Doro von Hand zu Hand says

    December 9, 2012 at 9:53 am

    very creative. i love this look!

    I linked to your tutorial on my blog – thanks for sharing!

    doro K.

Primary Sidebar

  • Bloglovin
  • Email
  • Pinterest
  • RSS
  • YouTube

Sign up for Email updates

From The Box Chain Series

Categories

Archives

TERMS OF USE

Copyright © 2021 Michele Pacey.

I am ecstatic if you choose to link to this site, use a brief description, one photo, or link back to any of my posts. Do not republish entire posts without my permission. Tutorials, patterns and printables are for your personal use only and are not to be used to make items for sale. Thank you.

Footer

  • Bloglovin
  • Email
  • Pinterest
  • RSS
  • YouTube
Copyright © 2023 Michele Pacey · Site developed by Autumn Street