
Lo and I celebrated 15 years of togetherness last Monday. My heart feels like it’s been kissed by the sun since I’ve known him. I dedicate this post, the result, and my very heart to him.
This wreath is inspired by those beautiful string wedding balloon displays, like THIS one, for example.
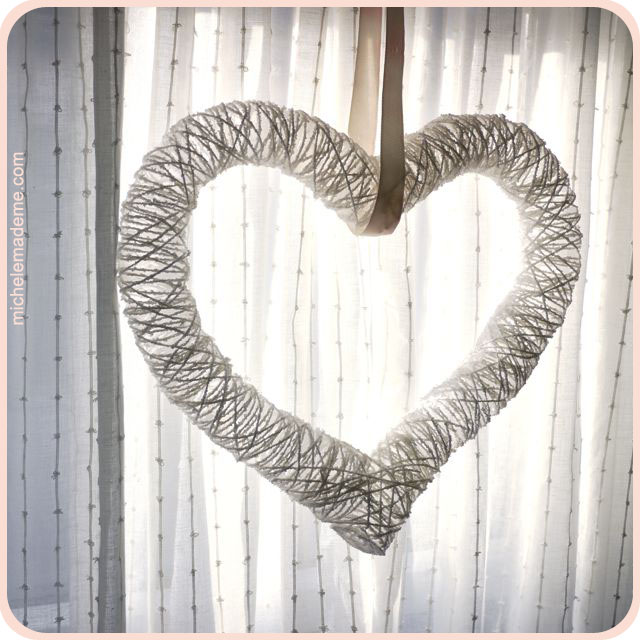
Tutorial ♥ A Sunkissed Heart Wreath
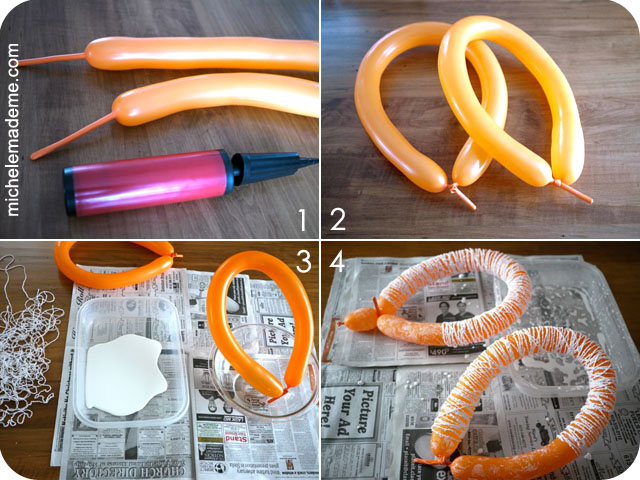
You will need:
- 2 long skinny balloons (the type used to make balloon animals)
- balloon pump (unless you have gorilla lungs)
- white (PVA) glue
- water
- container for glue
- yarn
- pair of scissors
- pin or sharp thing
- length of ribbon (optional)
- drop cloth or newspaper
Step 1. Using the pump, blow up the two skinny balloons. Try making them of equal size or as close to it as possible leaving tails a few inches long. Knot them.
Step 2. Gently tie the knotted end to the tail end to create two loopy balloons as shown.
Step 3. Cut up your yarn into several 2-3 ft (60-90 cm) lengths. Pour some glue out into the container. Add a little water to the glue to make it a little runnier than normal. Say 4:1 glue to water.
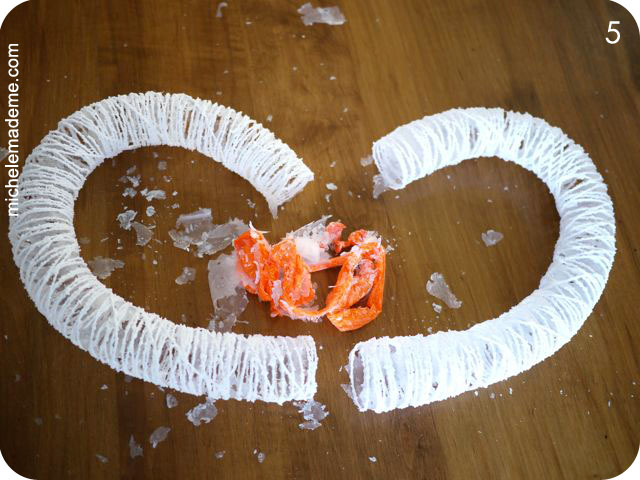
Step 4. Now to the messy part. One at a time, drop your yarn pieces into the glue, coating them fully and removing any excess dripping glue. Wrap your gluey yarn around a balloon. Continue in this way, wrapping your balloons with gluey yarn, criss-crossing over lower layers and building up a web of yarn around each balloon. Note that in photo 4, my balloons still require more yarn as they would NOT be strong enough to hold the shape if left as shown. However you do not want to fully cover the balloons either. You want the sun to shine through your heart (words of wisdom my friend)… Let these dry overnight on clean glass or plastic. Do not dry it on paper or you’ll wind up with gobs of paper permanently attached to your heart. No no.
Step 5. The next day: Prick the balloons with a pin (or sharp thing) and gently pull out the balloon carcasses. It’s cool how hard your pieces are, once dry. Now, you want to place your balloons side by side to see if they need to be trimmed or not, and to figure out the best way to join them into a heart shape.
Here’s what I did:
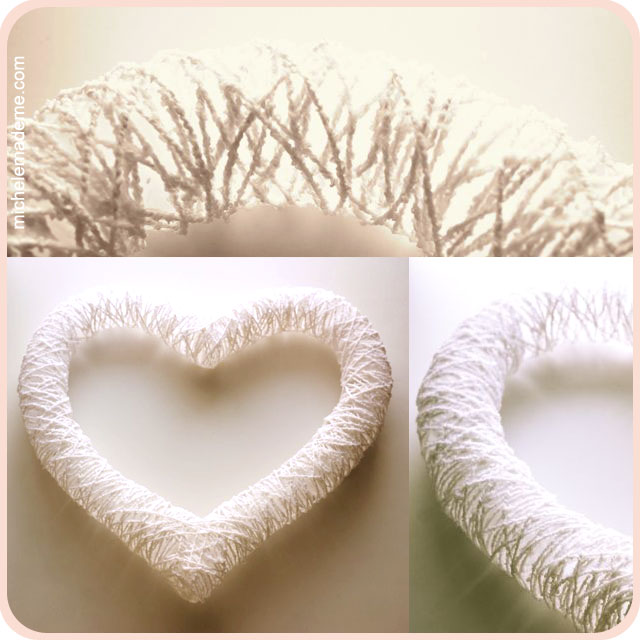
Step 6. I started with the bottom joint. I butted the two ends together as shown. No glue yet.
Step 7. And for the top joint, I cut away half the cylinder (equal in length to the diameter of the cylinder).
Step 8. This made a recess into which the other end fit nicely. Now I checked to be sure that with both sides butted together my heart was actually heart-shaped. I had to trim a little off the bottom of one side so it all looked hunky dory.
Step 9. I then strengthened both joints with several lengths of gluey yarn. Notice the many overlaps. Once dry, these joints are strong like bull. At this point, I also added a few lengths of yarn over the rest of the heart to make it extra robust. Allow your heart to dry out overnight on glass or plastic.
The next morning, find your heart ready to be hung up and admired!
String it up with a ribbon, place it in a window and let the sun beam through it. Just LOVE-ly!…
Happy anniversary Lo. My heart is yours. Let’s keep up the good work, okay?
♥M
Oh! And speaking of wreaths, check out my latest project. It’s a blog! I call it:

GORGE-OUS!!!!! I'm going to give this a try (as soon as I can round up some balloons) I took a quick peek at The Wreath Blog, looks great! As always, thank you so much for the inspiration!
Wow, Super great idea!!! it is lovely!
Congrats on your anniversary.
Amazing:)
need to try this!
This is awesome Michele, How wonderfully you have done it 🙂 cool ~
thank you so much June, Lisette, Daiga and Khadija for your sweet comments!
Crazy! In the best way! And pretty fabulous…only you could construct this idea. I am so impressed with the top joint – precise and wonderful!
Happy Anniversary to you guys, you sound like such a wonderful, mutually supportive pair of lovebirds.
The Wreath Blog – brilliant idea, I think it will be a huge huge hit! It's really beautiful…SOMEDAY I might need to come up with a wreath and hope you like it enough to give it a place of honor in your lovely new creation.
Thanks Michelle! I've no doubt that you will someday create some tiny wreath earrings or necklace. And when you do I'll be there!
Sigues sorprendiendome cada vez más! Una idea genial, un tutorial maravilloso y un corazón que es todo amor. LOVE LOVE LOVE
Núria
love it! pinned it! gotta try it!
Sounds like a plan to me, thanks Vanessa!
Congratulations – Happy Anniversary, what a milestone. I have figured out how to browse with google chrome so that I can leave a comment. I absolutely love this idea, fun to do with the kids too – balloons, goo, and string. Beautiful project, and happy anniversary again. (the newspaper shot with Mayor Miller made me smile too!)
Hee hee, I usually notice those types of things but Mayor Miller slipped by me this time, the sneaky guy!
the heart project is special… like you!!!
Bye Clod
Aw thank you Clod, that's very sweet of you to say!
happy anniversary… such a beautiful project to celebrate… … and you know what.. .the next 15 will be even more fun!!
Hugz
That's what we're hoping! 🙂
Wow – that looks awesome. I will admire from afar because I know myself well enough to know that my own version would….not look like this. At all. Whatsoever. happy anniversary!
This is a gorgeous wreath Michele! Congratulations on your anniversary!
15 years went by like a flash… It's crazy!
υπεροχο!!!!!!!
VRaiment très joli coeur ! Votre idée est géniale, merci de nous en faire profiter !
Isac
C est une très belle idée.Le résultat est plein de charme!
A bientot!
Pascale
Merci Pascale et Isac pour ces commentaires encourageants!
Very beautiful.
Thank you.
Wanilda
Congratulations Michele! A tremendously beautiful project to mark the day!
Hi Michelle. Your wreath is cool (and very pretty)! I have to say that I am amazed it keeps its shape so well after the balloon has been popped. Good old PVA eh!
It's quite amazing how like a rock it is. I'm pleased with that. 🙂
Just beautiful! I'm off to see your new wreath blog!!
Jill @ Creating my way to Success
http://www.jembellish.blogspot.com/
And thanks for your kind thoughts, everyone. I am so glad you like my anniversary wreath!
Girl. If I were wearing a hat right now, I'd take it off to you. You're a dang genius, that's what.
Beautiful Michelle! This is certainly going to make the bloggy rounds! 🙂
Michelle, you never cease to amaze me. This is beautiful. We'll have to meet up and craft together someday, maybe I can absorb some of your genius through sheer osmosis.
What a fabulous Michele creation. 🙂 Only you would take balloons, glue, and string and make something incredible.
I love that you used skinny balloons to make this, so clever! And the wreath is just lovely. I really like the simplicity of it.
Happy Anniversary.
You guys are making me feel like a champion today. Thanks so much Diane, Patricia, Melissa, Chris and Jessica!
Simple and magnificent! I love this wreath and in red or strong pink it will be a great gift for Valentine day! Thank you for sharing and good luck with your new blog!
love, xxx Alessandra
Serious?! What a great idea. Blow my mind whydontcha?!
PS I just popped over to the wreath blog and WHOA! Blow my mind again! You go girl!
WOW! Def. gonna try this. ♥ Thanks for the awesome tutorial. 🙂
{love}
Roudi @ c-is-for-craft.blogspot.com
I wonder if you really appreciate the excellence of your engineering skills! You continue to amaze me.
I have seen so many "glue and wrap string" crafts, I have grown tired of them. But THIS ! Brilliant! Beautiful! And if i hadn't already made two heart wreaths, I would make this one!
PS! Thanks for the heads up on the Wreath Blog! OMG. Like I need another wreath. But OMG! How can I not be inspired!
I love your heart wreath !!! It's gorgeous!! Congratulations to you and Lo!!!!! You two are so good together!!! Love you both!!!
This is beautiful. I shall definitely have to give it a go! Thanks for sharing it. http://fiddlyfingers.blogspot.com/
Beautiful work Michele and congratulations to you and Lo! I love the wreath blog idea. I have a fondness for wreaths as well and haven't made any in quite awhile. I will be looking for inspiration!
Thanks for the sweet words everyone!
Hello Michele,
I am getting married in May. I am making yarn balls that look like this. I know this is a bit of a strange request but I was wondering if you would be able to make me two of these hearts with purple yarn for my wedding. I will be willing to pay the shipping, cost of materials, and a some for your troubles. Thanks so much!
Hi Kimberly,
If you email me directly at michelemademe (AT) gmail (DOT) com, then I'd have your email and we could discuss this further.
Until then, have a great day.
Michele
Well, you'll be happy to know that I audibly GASPED when I saw this. My husband was worried. And all I could say was: "it's so beautifulllllll…….."
That is absolutely gorgeous!
I'm trying to make your heart right now! I've wrapped the balloons and set them to dry overnight. It's morning, and they aren't quite dry yet, but I made them last night, so I think they need a few more hours. Do you mind if I ask what kind of yarn you used? I used just a cheap acrylic and now I'm a little worried that it won't soak up the glue well enough. Did you use wool or cotton or acrylic or something else?
Thanks! Robin
Hi Robin,
Oh, so excited that you're giving this a try! I used some thrifted yarn I had… so it didn't have a label but I'm almost 100% certain there's a good amount of cotton in the yarn. However, I wouldn't worry too much about it. It does take a while to dry completely. And different yarns will probably dry at different rates. So let it do that, and I bet you it will get nice and hard once done. Fingers crossed for you that all goes well!
Have a great evening Robin. 🙂
Wow, it's great and very beautiful! I like it so much!
thank you LarisaY!
My angel 🙂 http://podelki-doma.ru/wp-content/uploads/2011/12/angeln.gif
I like all your works…but this one…..pure poetry…….
That is so nice Katia, thank you. 🙂
Michele, Your words and your art actually made me cry (in a good way. I love all of your work, and my granddaughter is into recycling, and my daughter throws a wonderfull Halloween party every year (spiders), so we will be doing a great many of your wonderful tutes.Happy Anniversary you two love birds.
this is so gorgeous thank you for the tutorial I so want to try this x
PERFEITO! QUE LIN-DO!
AWSM AWSM! Ive done the baloon chandelliers for my sister's baby shower and been wanting to makesomemore and hire out for weddings ….how awsm this variation would be!!! gonna try it 🙂
a gorgeous idea! fabulous! fantastic!
will try asap!
Thanks so much for sharing such a great idea! Love it!
DIY Craft Projects on Facebook is stealing your project, removing your watermark and posting without crediting you.
Here's the link: https://www.facebook.com/photo.php?fbid=671066999580029&set=a.560239393996124.1073741826.560229000663830&type=1
I thought you might want to know.
Kim
I can't view the wreaths at the "wreath blog". 🙁
This s d most beautiful thing I have seen!!!thank you…ur creation s gonna hang in a house in india…(Ie if m successful makin this):) 🙂
Is Elmer's glue the same thing as PVA glue? When I popped the balloon the yarn did not hold it's shape at all. Wondering what I did wrong.
Hi Jay,
PVA (poly-vinyl acetate) is a strong variety of white glue. I think Elmer's is probably diluted somewhat for kids so I would advise against using it in this project.
Michele
I started on this project yesterday and when I popped the balloons this morning the yarn held the round shape of the balloon, but it was really flimsy, like a slinky. If I put it into the shape it looked fine, but it wouldn't stay in the shape when I moved it.
This is awesome! It would also look pretty if after it were dry, you spray painted it pink or red! 🙂
This is so great.
Thanks so much!