Hi.
Can’t believe it. But here we are almost HALF-way through November. Which can only mean one thing: Christmas ORNAMENTS!!!
As evidenced by the last two years’ ornament series (found HERE on the Series page), it appears I can’t be happy making one style of ornament per year. No no. Once I get going, it’s a pretty much an out-and-out rampage. But it’s a tradition, see? So, let this be the beginning of the 2012 ornament series, okay? I’m starting with one of my favourite holiday motifs. The snowflake!
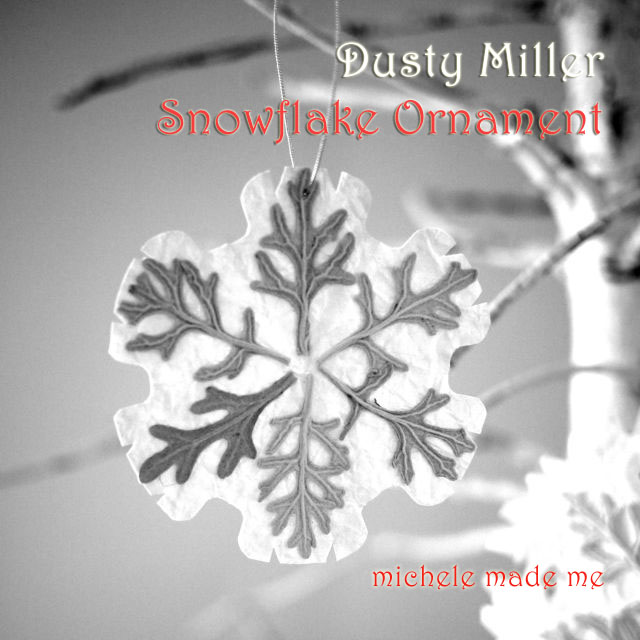
Tutorial ❆ Dusty Miller Snowflake Ornament
You will need: dusty miller leaves, iron, plate, microwave oven (optional), paper, compass, pair of scissors, glue, pretty string
Are you familiar with Dusty Miller? It’s a very popular bedding plant here in Canada. It has these lovely, sculptural, fuzzy, silvery-grey leaves. I don’t have any in my garden but, seventeen of my neighbours do, so that’s where I got my leaves. The plants are fairly hardy and some in my neighbourhood are still alive despite the cooler weather. But as soon as we have a few nights of frost in a row, these little guys’ll be toast. I was lucky enough to get my hands on a few recently dead ones from the neighbour’s garden… Thank you neighbour!
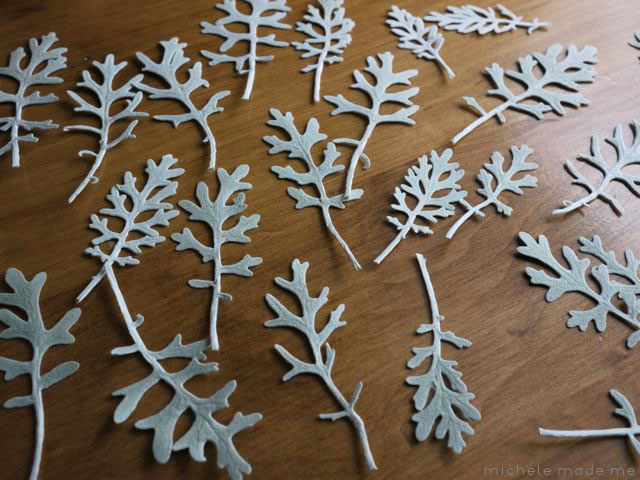
Prepare The Leaves:
To get the leaves ready for this craft, they need to be pressed and dried. Don’t worry it’s quick! Here’s what you do.
Pick a few Dusty Miller plants. Alive, or recently dead, it doesn’t matter. Snip off several pretty leaves. You’ll need 6 similar-sized leaves per snowflake. Iron the leaves without stream. That’s right, grab your dry iron and press the leaves flat. You may want to put something between your iron and the leaves. But I didn’t. I just went for it! Now to dry them out, you could let the leaves air-dry for several days. Or you could do what I did. I put my pressed leaves on a plate and nuked them in the microwave on HIGH for 30 seconds. And if they were not quite dry after the first 30 seconds, I put them in for an additional 30 seconds. And if you find that the tips of the leaves have curled a bit during microwaving, just give them another quick press with the iron. And now you are ready to make snowflakes!
Make Snowflakes:
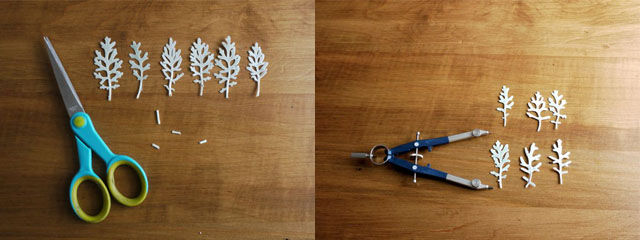
Find 6 similar-sized leaves. Trim them all to about the same height. Get your compass and open it to a width slightly taller than your leaves. Set aside.
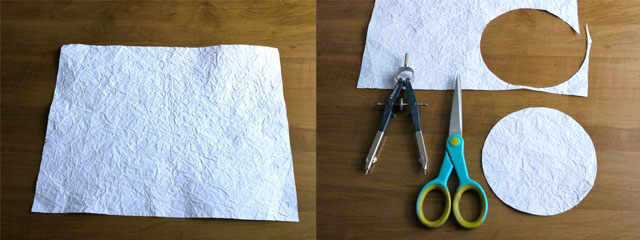
Take out a piece of white printer paper. Smoosh it up real good. Like, real good.

Flatten your paper again and press it with a dry iron. Draw a circle on the paper using your prepared compass. Cut out the circle.
Now to fold the circle in preparation for snowflake-making. Start by folding the circle in half. And fold it in half again but only to crease the center.
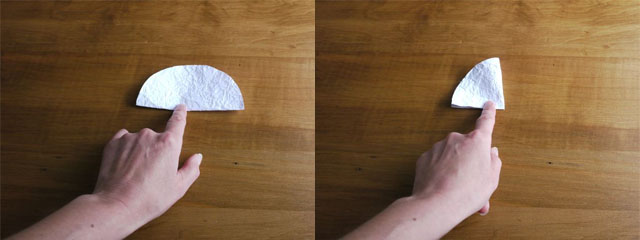
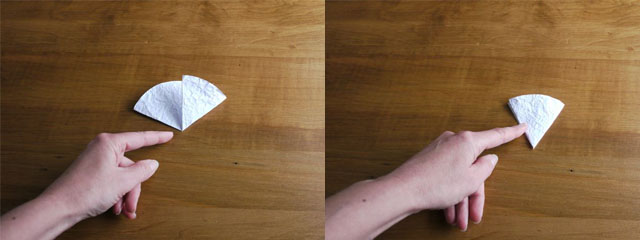
Open it up again and from that creased center point, fold the right side two-thirds up to the left across the circle as below. Now, fold the left-hand third up to the right.
Fold the whole in half again. Now, along the upper part of that final fold and along the outer edge, cut out some small shapes from the paper. Do not cut into the apex or bottom half of the circle. Little triangles and rectangles are easiest to cut out.
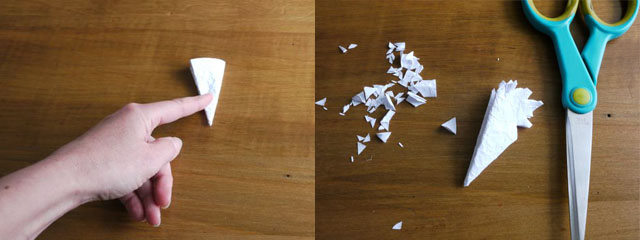
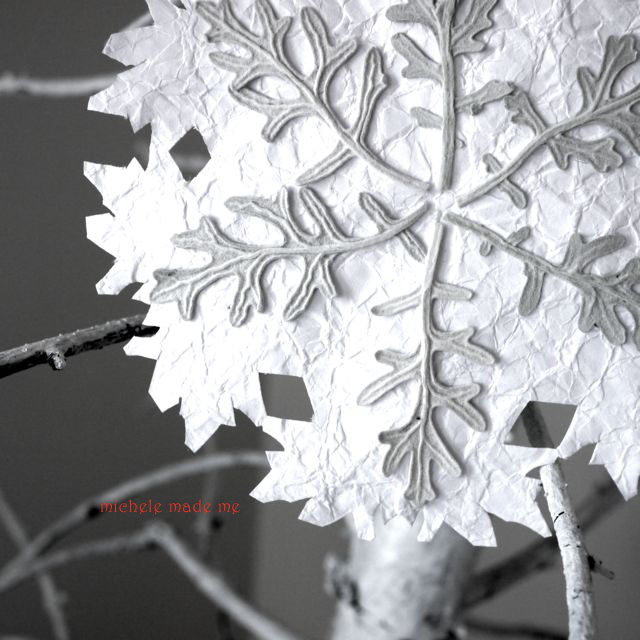
Unfurl your snowflake and press it flat with a dry iron. Notice the center of the snowflake is not cut up. Okay now get out your six Dusty Miller leaves.

Glue the leaves flat side down onto your snowflake shape. Make a bunch of different-sized snowflakes. Attach pretty string hangers.
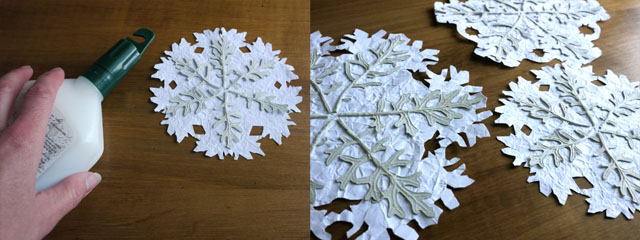
And hang ’em up!
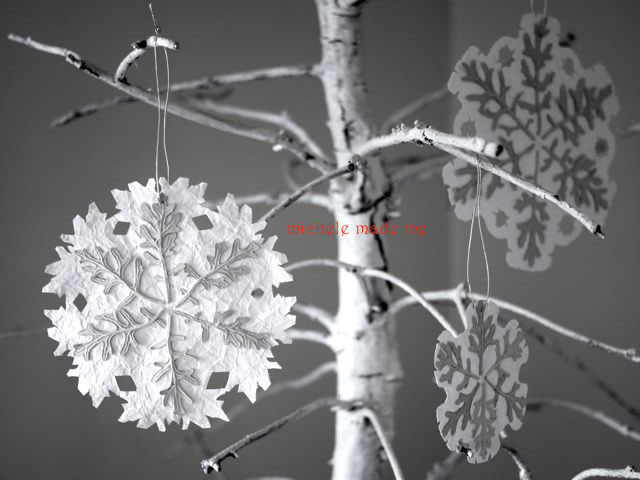
Oh, the easy elegance of Dusty Miller snowflake ornaments…
BEAUTIFUL…..!!!
xxx Alessandra
Ok, that's just a seriously cool craft! I'm assuming you have to toss them after Christmas? But, oh so easy to make again next year!
Actually I can't tell you either way because this is the first time I've made them. But I have every reason to believe they will last beyond this year because the leaves are dry and leathery… But still, it's a wait and see situation. 🙂
Hello Michele,
Awsomeness…pure awsomeness! i love Christmas and these decorations are gorgeous! Thanks for the tutorial.
Gorgeous!
Big hug,
Giac
This is so cool Michele! I remember the beautiful snowflakes you made last year and my poor attempt at cutting one…!
dear Michele
beautiful ornament!you're a true paper wizard.
get's on my to do-list for this christmas, for sure.
Kind Regards
Natalie
They are lovely! Ahh, I love ornament season too my friend! I have plans to make some more this week if the kiddos let me.
Thanks for sharing your lovely tutorial. I thought Dusty Miller was the name of a shop! The snowflakes you've made looks so very pretty x
deliziose!!!! Lory
These are very pretty. I'll have to hunt down some dusty miller and make some for my daughter.
Heather M.
Fantastic!
Extremely beautiful, Michele! Thank you for the idea! Unfortunately I am very busy now and far away from the Christmas mood… So, maybe I'll try to make this ornament around Christmas. But I will!
Gotta find me some DUSTY MILLER!
I love all things snowflake and these are so pretty!
◄-l-o-v-e-►
pretty indeed
Hooray for DIY Christmas ornaments series! Thank you, Michele. I love these ones and can't wait to see more.
How cool! I have a perennial dusty miller that has even whiter leaves. Just looked at it this morning and it is struggling…as in almost dead. This will be a great way to immortalize the poor thing. Thanx for sharing!
We know that plant as Cineraria, its a delight and available in 3 slightly different shades of silver.
Ive had a small plant thats survived snow and winter over here these past few years, it must be in a good position!
But I have had them over winter in a previous garden too and they are a joy to see in dark winter months, hanging in there, defiant!
Love the name you use…..dusty miller lol very apt!
Oh yes! Its another cracking idea for a dangly too!!
What an amazing use for Dusty Miller! Wish I had some languishing in the garden right now…
I don't know what it is about dusty miller that takes me to that potpourri – wooden apples and chalkboards teacher necklace place in my life, but you have totally reclaimed it. I laughed out loud when I saw this incredibly beautiful ornament, actually I'm still laughing. I can't wait to show my mom.
Love these – hard to believe they are made from actual leaves! Great idea.
These are so pretty, I'm going to have to look for some leaves.
Also: I had no idea that was the name of the plant.
Also #2: I knew a kid in high school whose name was Dustin Miller & he went by Dusty. Weird memory to spring up.
Thanks for the tutorial! We probably don't have this plant here in Greece but a good idea always inspires me!
Love them! What a simple and beautiful project! I wish I still had some dusty miller. Even though it is supposed to be an annual, mine came back every year here in Colorado. Then we moved. 🙁 Guess I'll have to plant some more!
I love how eager Dusty Miller is to be preserved and how beautifully it remains once dried and pressed. Almost as if it were fresh.
The snowflakes are spectacular!
May I offer a bit of caution however, – not all fall foliage will tolerate the "quick dry" methods.
I can imagine myself following your lead and creating a vase using Dusty Miller in place of dried fall leaves. A beautiful way to celebrate the winter.
Great idea! Thank you!
hi i am gopika i am frm kerala
its very wonderful!
So delicate and lovely… I'll be looking at dusty miller with fresh eyes from here on out! Btw, I shared your link on my FB page and the ornament is receiving lots of glowing praise.
amazing! you are talented artist! thank you for sharing!
shana
So cool and creative. Unfortunately, don't have any Dusty Miller plants here in the desert. However, I'm originally from Wisconsin, and I don't think we grew them there either. And my mother had a vegetable, berry and flower garden. She (unlike me) had a wonderful green thumb. Btw, I ALSO have 10 siblings (I'm number 5) six sisters, and four brothers. I'm (assuming) I'm a bit older than you though.