Today’s ornament story began a while ago, back here in February, when I received several puzzle pieces in a package from my bloggy friend Melissa. I’m fairly certain it was a bit of an unspoken crafty challenge on her part, eh Melissa? Like: “What can you make with these, Michele?” Well, I finally took the bait, 9 months hence, and here’s the concoction I mixed up…
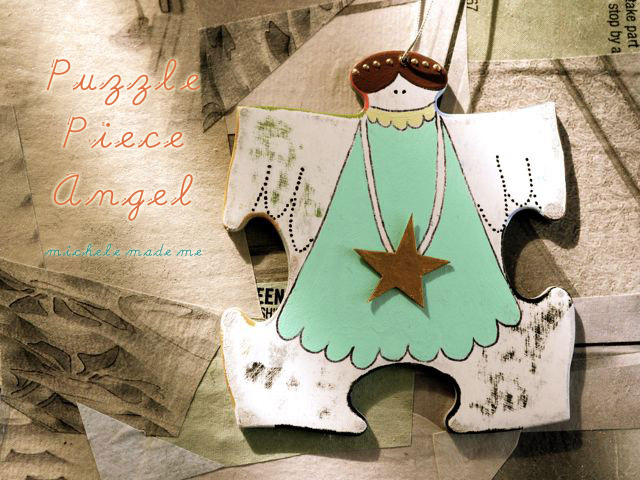
Tutorial ❉ Puzzle Piece Angel Ornaments
You will need: old large-ish puzzle pieces, fine grit sandpaper (I used 220), large sewing needle, pencil, fine tip marker, liquid acrylic paints, small paintbrush, gold dimensional paint (optional for halos), small piece of cardboard, glue, pair of scissors, pretty string for hangers.
The puzzle pieces I used are the ideal size for ornaments at about 3 inches by 3 inches square (7.5cm x 7.5cm). Out of the pieces Melissa sent, I chose some that resembled little people: with heads, arms and legs.
To start, I sanded the fronts of the pieces with fine-grit sandpaper (220 grit). I sanded lightly to remove only the ink and not the layer of paper underneath. The sanding gives your puzzle pieces a lovely distressed look but, more importantly, the slightly roughed-up surface will hold on to paint and marker famously.
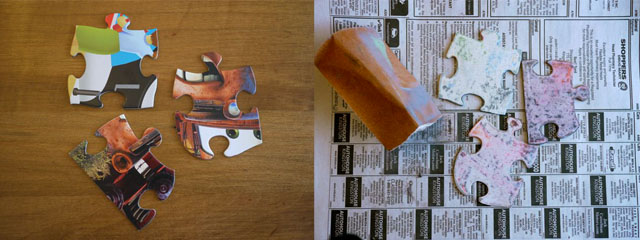
Then I used a large needle to pierce a hole in all their heads. I know that sounds slightly horrific and everything, but they are angels after all…
So once I did that… um, I took out my pencil and very lightly drew the angelic details on each piece. I drew on hair, eyes, a dress with collar, wings, skinny arms, and a halo. Once I was happy with my design, I re-traced the pencil lines with a fine tip Sharpie (a.k.a. a marker).

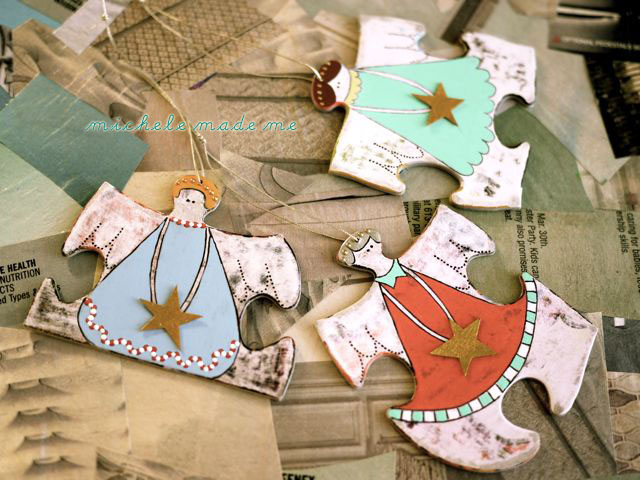
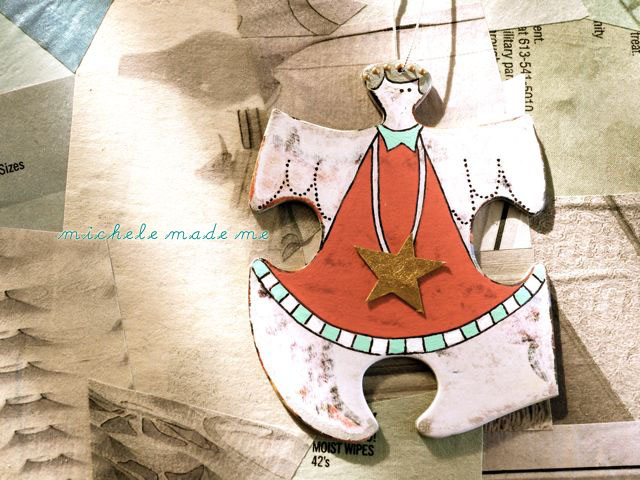
Then I took out my liquid acrylics and painted the other-worldly hair, dresses and collars. While I waited for the paint to dry, I made some little stars out of cereal box cardboard, and gave each a gold finish in liquid acrylic.

The stars, once dry, were then glued to the “hands”, and a halo of gold dimensional paint dots was added to each head. And lastly, I added the hangers.
Hark!… Is that singing I hear?
Why I think it is! A choir of Puzzle Piece Angels… How very sweet of them to sing for us like that. And they don’t even have mouths! Now THAT is what I call talent.
assolutamente delizioso!
I love these, might have to check out some old puzzle pieces. One question though, what did you do to the back of the piece? Sam x
Fabulous idea!!! Love it Michele. Wanna do an ornament swap with me? We could send eachother 2-3 ornaments. It would be fun and we haven't swapped in awhile. Let me know!
Hello michele,
Great project…I am going to try doing this with my niece as soon as she stops putting everything in her mouth.
Big hug,
Giac
Vraiment magnifique !!!
Nadia
wow this is sure a great Idea! Simple and easy!
Such talents! Singing without having a mouth!
These are the most adorable ornaments I’ve seen in a long, long time! Such a great idea. Now I want to buy me a large pieces puzzle and start making them!
Oh heavens, that is so cute! Now I want to go to the thrift shop and find some old puzzles! Thanks for sharing these, I look forward to seeing these posts!
Absolutely brilliant Michele.Straight off down the charity shop to buy some giant childrens puzzles. Hugs Mrs A.
They are so cute! I wouldn't have seen the shape of an angel in the puzzle piece!
*waves*
Claire
Awww clever and cute! Great repurpose 🙂
Brilliant…truly brilliant 🙂
they're so really pretty!! fabtastic work!!
best wishes, doro K.
Love the idea of using/recycling puzzle pieces into ornaments. I've posted the top image and a link back to your blog on my Holiday Crafts Tumblr blog.
I like your enthusiasm for ornaments, Michele! Way to take on the challenge of puzzle pieces. I can tell you're enjoying yourself. : )
Oh, perfect!!! I love them so much, esp. because puzzle pieces are boring craft supplies that have always defeated my attempts to find something fresh to use them for. Bravaaaaa!
hey, you're angel challenge turned out sooooooo well! they're fantastic!
a lovely idea, thank you for sharing ☺
regards, dana
Love them! Great idea (as always) 🙂
Once again, you have amazed me. These are brilliant! When I grow up, I want to craft like you!
Great idea!!!
They are just too gorgeous for words! I'm off to raid the puzzle boxes at our house … do you think my lot will miss a few from each box – I think it just makes the puzzle all the more interesting 😉
really fantastic, congratulation!!! 😀
Very nice, thanks for the information.
Those are just damn cute, love the lateral thinking. Wish I could look at a puzzle piece and see an angel. You have a fun mind.
How clever are you, Michele! I would have never seen an angel in a puzzle piece. They are so cute and folksy! Bravo!
So cute! If you decide to sell any, I want 2!! Or 3. These would be perfect gifts for family, but I know I'm not going to have time. Nor would they look nearly as cute as yours! I'm serious about that buying thing! 🙂 Awesome!
Awesome, awesome, awesome x a zillion.
what a clever idea! love it 🙂
You are amazing… These are brilliant!!!
your works amazing 🙂
I am all over this one – I love puzzle crafts. 🙂
Wow great Angel Ornaments. Love them. Will have to run soon to the thriftstore to make some of my own ;).
I just shared your pictures with a link to you in my An Angel Each Day blog :).
Creative greets from Susan
Fantastic job!
you are amazing! love your ideas. Greetings from Poland 🙂
i totally fell in love with this little angel!
I linked to your tutorial on my blog – thanks for sharing!
♥, doro von Hand zu Hand
really your picture so awesome. i'm loving with puzzle too. may i save your picture? thankyou before